
CREATION OF A SQL WEB API SERVICE THAT READS DATA FROM THE DATABASE
In today's digital environment, web API services are becoming crucial for developing flexible and scalable applications. Throughout this page, we will guide you through the process of creating a SQL Web API service that reads data from a database using ASP.NET Core. This application will allow you to understand how data from the database is converted into JSON format that can be used by client applications.Why Use These Tools and Packages?
In order to build an efficient and functional web API application, it is necessary to use certain tools and packages. Each of them has a specific role in the development process and allows you to:
- Effectively Communicate with the Database: The Microsoft.Data.SqlClient package enables the establishment of a connection between your application and the SQL Server database, while Dapper enables fast and simple transformation of SQL query results into C# objects.
- Accelerate Working with Data: Dapper is known for its speed in mapping query results to C# objects, thereby reducing complexity and increasing application efficiency compared to heavier ORM solutions.
- You Develop and Test an Application: VS Code or Visual Studio are powerful tools for developing and testing applications, providing you with everything you need to write, debug, and manage code.
Required Software and Packages Before starting development, make sure you have the following tools and packages installed:
- Recommended dotnet Version: Ensures you are using the latest functionality and enhancements in the .NET environment.
- Visual Studio Code or Microsoft Visual Studio: Development tools that make it easy to write and manage code. In this example we will use VS Code.
- SQL Server: The database where your data will be stored. This tutorial uses SQL Server as an example.
- Microsoft SQL Server Management Studio: A tool for managing and working with SQL Server databases.
- Microsoft.Data.SqlClient: A package for establishing a connection with the SQL Server database and creating queries.
- Dapper: A library that allows mapping data from a database to C# objects, providing efficiency and speed in working with data.
- Recommended dotnet version.
- VS Code or MS Visual Studio. This example uses VS Code
- Database. In this example, a SQL Server database is used
- Microsoft SQL Server Management Studio
- Microsoft.Data.SQLClient. It is a package that allows a database connection to be established and queries to be created
- Dapper. This package allows data to be imported from a database and converted into the appropriate C# objects
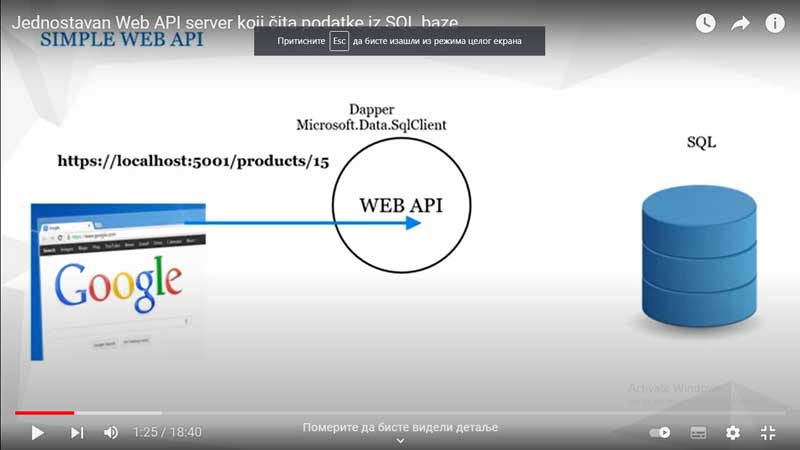
Figure 1: ASP.NET core web API server - client call
In addition to the web application that we are creating, we need to have one database, for example a sql server database that contains some data, e.g. product table. The goal of a web API application is to respond to a client's request for a specific product.When a GET request is made, for a specific product for example with id = 15:
https://localhost:5001/products/15
the application will try to extract the appropriate product from the database and return it to the application (picture 2). Using the additional package "Dapper", which we installed with the application, the corresponding row of the table will be converted into a corresponding C# object that has the same structure as the table in the database. You can see an example of the Product class in Figure 3.Further, the web api converts the data into a JSON object and then the object is returned to the browser (see Figure 4).
Video 1: A simple web API server that reads data from a database - part 1 |
Video 2: A simple web API server that reads data from a database - part 2 |
A more detailed explanation of the Web API architecture:
- Controllers: In the Web API architecture, controllers are responsible for handling HTTP requests and returning responses. Each controller defines a set of actions that respond to specific routes (URLs).
- Models: Models represent the structure of data and define objects that are used to exchange information between different layers (eg from a database).
- Service layer: This layer contains the business logic of the application as well as the interaction with the database. Controllers call the service layer to perform certain operations on data.
This architecture makes it easy to maintain, test and scale the application.Safety recommendations:
- Authentication: Implement secure authentication methods like JWT (JSON Web Token) or OAuth2 for user verification.
- Authorization: Control access to resources using Role-based or Policy-based authorization to ensure that only authorized users can access sensitive data.
- Data protection: Uses SSL/TLS encryption for secure data transfer and protection against attacks like SQL injection or Cross-Site Scripting (XSS).
- Caching: Implement response caching at the server or client level to reduce the frequency of requests to the database.
- Query Optimization: Uses indexes and optimized SQL queries to reduce processing time and improve application performance when working with large amounts of data.
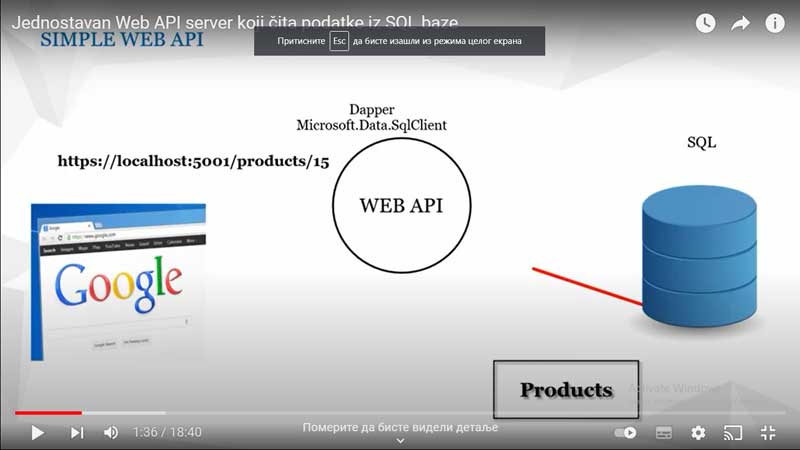
Figure 2: ASP.NET core web API server - GET request for a product from the database
The application should have a model class whose fields correspond to the fields found in the database so that record can be converted into a c# object so that the application can create an object that will connect to the database in code a client for the database must be created , and therefore the additional package "Microsoft.Data.SqlClient" is needed.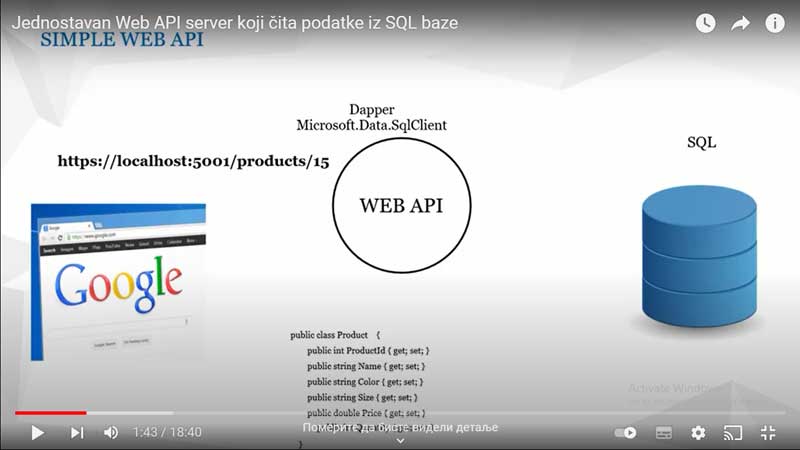
Figure 3: ASP.NET core web API server - Product class model
|
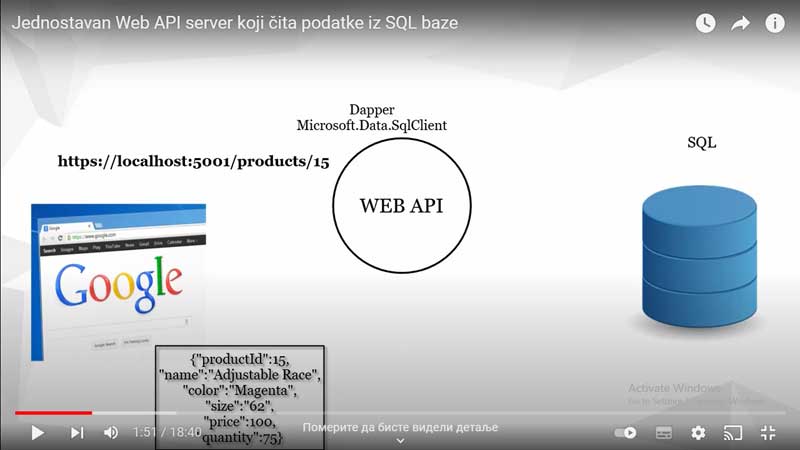
Figure 4: ASP.NET core web API server - returning a JSON object to the client (web browser)
|
Creating a restful web api server
In order to create a new web api application in the Command Prompt within the previously created root folder, type|
dotnet new api
as can be seen in Figure 5.
|
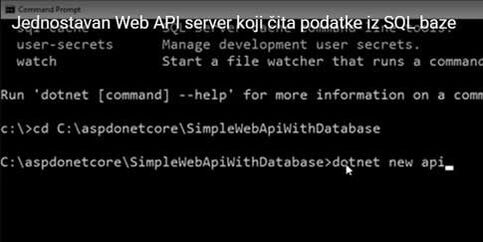
Figure 5: dotnet WEB API - Creating a new application in the CommandPrompt
|
code .
VS Code will launch and open the project you just created.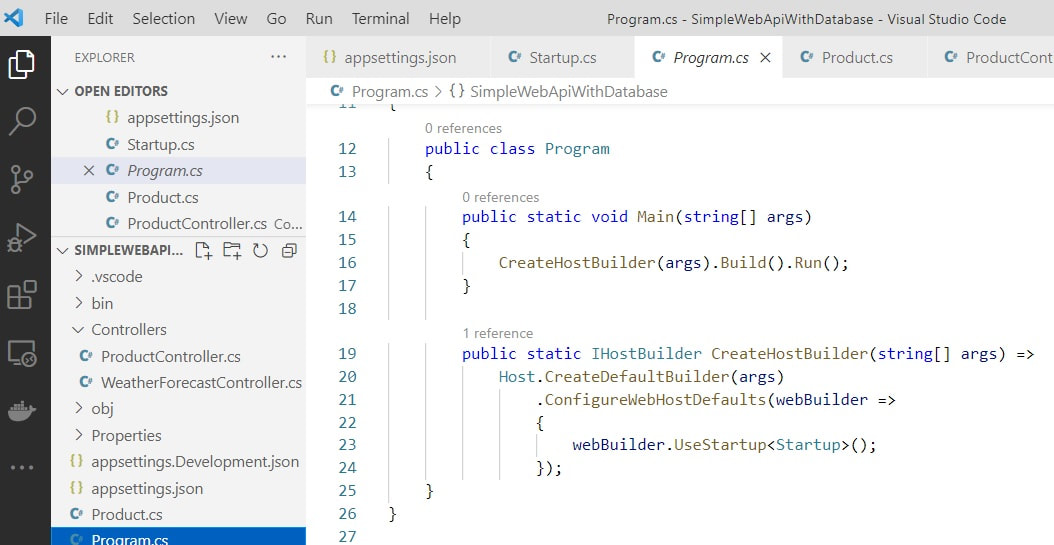
Figure 6: SimpleWebApiWidthDatabase application - class Program.cs
Now on the left side in the explorer you can see the created initial files of the just created application. In the right part, you can see the content of the initial Program.cs file in which the host object of the application is configured. Since a database is required for products, a database should be created, in this case a SQL Server database, which will be called "database_product" in this example. The database and the "Products" table in it were created using the Microsoft SQL Server Management Studio tool. The design of the created table can be seen in the image below: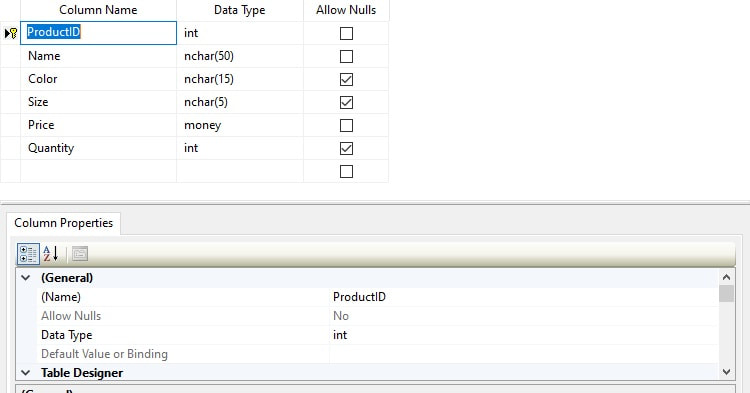
Figure 7: Sql Server Database: Database "database_products", for products
In order for the application to connect to the database, the packages mentioned above must be installed:- Microsoft.Data.SQLClient
- Dapper
We will create a ConnectionString inside the appsettings.json fileSee in the following video how the Dapper library is used to read data from the database and convert it into C# objects. The video shows the use of appropriate queries for that purpose.
A useful tutorial on using Dapper: dapper-tutorial.net/
If you want to try Dapper queries: dotnetfiddle.net/
The Dapper Library
Dapper is a lightweight data access library in .NET applications that enables efficient and simple mapping of database data to C# objects. It was developed to provide speed and simplicity compared to other ORM (Object-Relational Mapping) libraries like Entity Framework, while maintaining flexibility and control.Here are some key points about the Dapper library:
- Simplicity and Speed: Dapper is known for its speed, as it is designed to be minimal and avoid the complex processes that some ORMs use. This speed comes from its ability to directly map query results to objects without much additional overhead.
- Result Mapping: Dapper allows mapping the results of SQL queries to C# objects using simple methods such as Query<T> and QuerySingle<T>. This simplifies working with the data and reduces the need to write a lot of code to transform the data.
- Compatibility with SQL Server and Other DBMS: Although most commonly used with SQL Server, Dapper is compatible with various databases, such as MySQL, PostgreSQL, SQLite and others, using the appropriate ADO.NET providers.
- Impartiality: Dapper does not provide functionalities such as automatic creation of migrations or complex queries. Instead, it provides a tool for writing SQL queries and commands directly, allowing full control over the SQL being executed.
- Extension to Existing ADO.NET: Dapper is used as an extension to existing ADO.NET objects, such as IDbConnection. This makes it possible to use Dapper in already existing projects without the need for significant modifications.
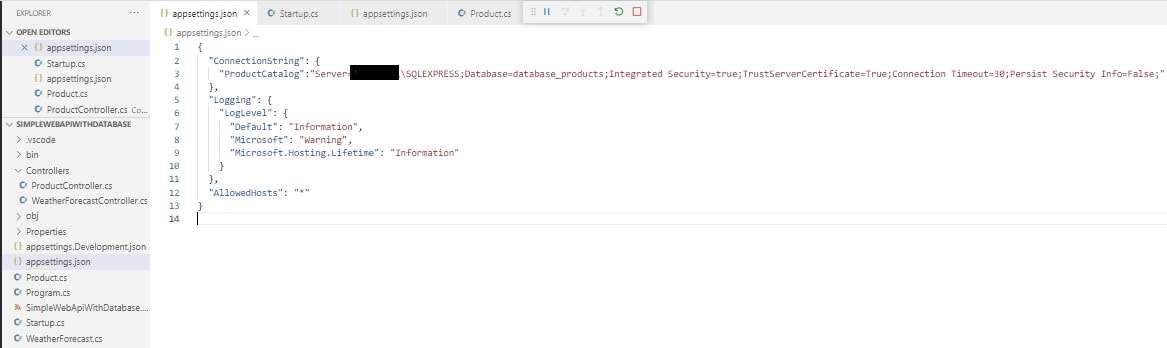
Figure 8: SimpleWebApiWidthDatabase application - ConnectionString defined in appsettings.json file
Within the startup file, within the configuration method, we will create an object with which a connection to the database is established. To create that object of the SqlConnection class, we use the information written in the connection string defined in the appsettings.json file, as can be seen in the following image: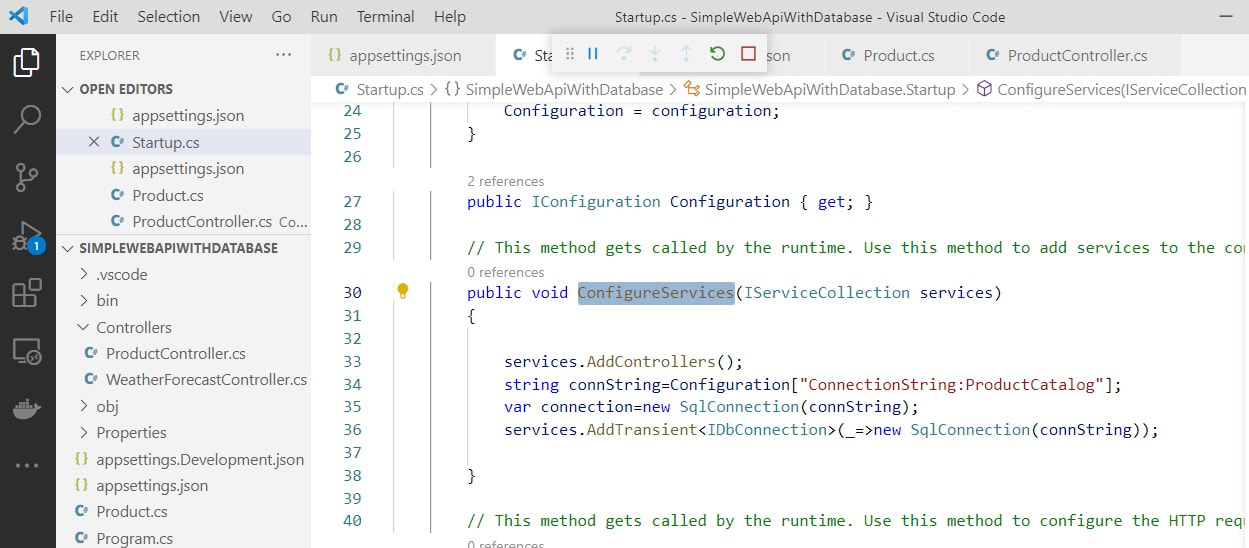
Figure 9: Web API Server: Controller class "ProductController"
.Within this method, it injects dependencies between the classes in the application (DependencyInjection) and the services and objects they need. Within this method, services are created that are added to the collection of services (IServiceCollection), which will be available in classes within the application via parameters in the constructor. This concept is called IoC Inversion of Control and see more about it in the video: IoC Inversion of Controlin .Net Applications. Also, controllers should be added to this collection.
Configuration Instructions
When working with static pages in an ASP.NET Core application, it is important to properly configure the server to serve them. This is accomplished by adding specific lines of code to the Startup.cs file, which is key to configuring and initializing the application.public class Startup{
public void Configure(IApplicationBuilder app, IHostingEnvironment env)
{
// Use default files such as index.html if no other file is specified
app.UseDefaultFiles();
// Enables serving static files from the wwwroot directory
app.UseStaticFiles();
// Other middleware and configurations
}
}What these lines of code do:
app.UseDefaultFiles();
- What it does: This line allows the server to automatically use the default files when the user does not specify a specific file in the URL. For example, if the user visits http://localhost:5000/, the server will automatically return index.html from the wwwroot folder if it exists.
- Why it's important: This is useful for providing a basic page like index.html when a user visits your application's root URL, without having to explicitly specify the file name.
- What it does: This line allows the server to serve static files such as HTML, CSS, JavaScript, images, etc., from the wwwroot folder. When a user requests a URL that matches a file in wwwroot (such as http://localhost:5000/Students.html), the server will find that file and send it to the client.
- Why it's important: This command allows your application to efficiently serve the static resources needed to render web pages, thereby allowing users to see the content of your web page.
Configuration of the wwwroot directory:
- wwwroot is the default directory for static files in an ASP.NET Core application. When you add this configuration, ASP.NET Core automatically looks for static files in this directory.
- How to add files: To add static pages such as Contact.html or Index.html, simply place them in the wwwroot directory. URLs like http://localhost:5000/Contact.html will now return the appropriate content from that file.
These configuration lines enable efficient serving of static content and allow you to easily extend your application with static pages as needed.Within the Configure method, the required "Middleware" should be defined and the order in which they should be executed. Read more about it in the article: Middleware
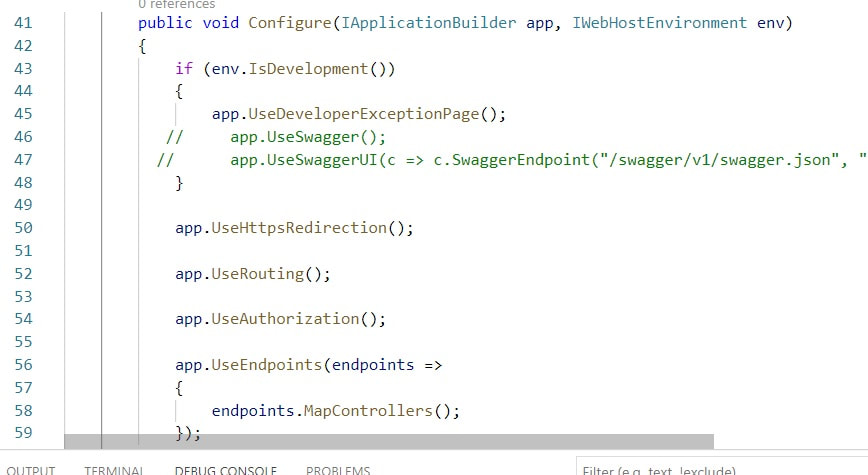
Figure 10: Web API server: Startup class, "Configure" method
This application will have classes belonging to the model, as well as one controller class. As a model, we will create the Product class, which will be a class model for objects that represent data about a specific product and will have the same structure as a record in the database, so it will have the same fields. Figure 12 shows the Product class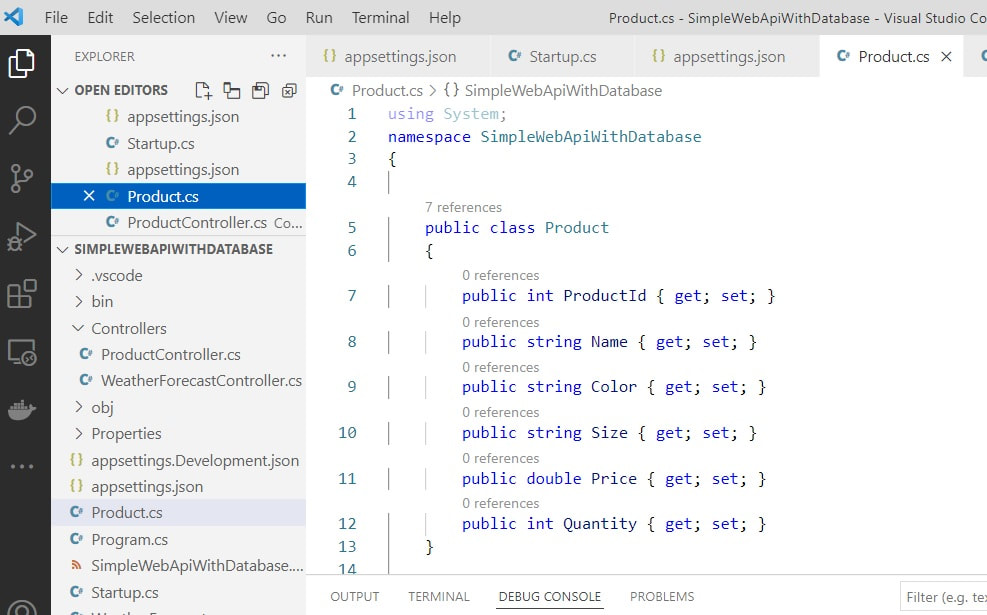
Figure 11: Web API server: "Product" class
Inversion of Control (IoC) in .net applications
Inversion of Control (IoC) is a design principle in software development that enables greater flexibility and testability of applications by reducing dependencies between components. In the context of .NET applications, IoC is usually used with DI (Dependency Injection), which is one of the most popular ways to implement IoC principles.Key Concepts of IoC
- Inversion of Control (IoC): This principle refers to the transfer of control over the creation of objects and the management of their life cycle from the application code to some external system, most often the IoC container. Instead of the component directly creating and managing dependencies, the IoC container does this.
- Dependency Injection (DI): This is a technique for implementing IoC where dependencies (eg services or objects used by a class) are "injected" into a class from an external source, rather than being created by the class itself.
- Constructor DI: Dependencies are passed through the class constructor.
- Property DI: Dependencies are set via public properties (propriets).
- Method DI: Dependencies are passed through a method.
Advantages of IoC and DI
- Reduced Dependencies: Components are less dependent on each other, making the code more flexible and easier to change.
- Increased Testability: With externally injected dependencies, it's easy to use mock objects or stubs in testing.
- Better Code Organization: Using IoC containers helps to organize and manage dependencies, thus reducing the complexity of the code base.
- Changing Implementations: Ability to easily change implementations of dependencies without changing the code that uses them.
IoC Containers in .NET In the .NET ecosystem, there are various IoC containers that you can use:
Microsoft.Extensions.DependencyInjection: This is the core IoC container that comes with .NET Core and .NET 5/6+. It provides basic DI functionality and is easily integrated into .NET applications.
Autofac: A more advanced IoC container with additional capabilities and configuration.
Ninject: Another popular IoC container known for its flexibility and ease of use.
Unity: Microsoft's IoC container that is part of the Enterprise Library.How it's used in .NET applications When using IoC in .NET applications, you'll typically register your services with the IoC container during application initialization, and then the IoC container will automatically provide the necessary dependencies for your classes. For example, in ASP.NET Core applications, service registration is done in the Startup.cs file:public void ConfigureServices(IServiceCollection services)
{
services.AddTransient<IMyService, MyService>();
// Add other services
}And then, when you use IMyService in your controllers or other classes, .NET will automatically provide an instance of MyService:public class MyController : Controller
{
private readonly IMyService _myService;
public MyController(IMyService myService)
{
_myService = myService;
}
}In short, IoC and DI are key to modern .NET applications because they help maintain clean, flexible, and testable code.
Performance optimization:
- Query Optimization: Indexes should be used to speed up data access and reduce the processing time of complex SQL queries. It is also necessary to analyze queries using SQL Server tools like Query Execution Plan to identify and improve slower queries.
- Caching: Data caching needs to be implemented at the application or database level. Use Redis or Memcached to store frequently used data, which will reduce the frequency of access to the database and speed up the application.
Safety recommendations
Security is crucial for any web API service to protect data and prevent unauthorized access. Here are some key security recommendations and how to implement them in an ASP.NET Core application:Authentication Authentication is the process of identifying the user accessing your API. It is recommended to use JSON Web Tokens (JWT) for secure authentication.
How to Implement JWT:
- Adding a NuGet Package: Add the Microsoft.AspNetCore.Authentication.JwtBearer package to your project:
dotnet add package Microsoft.AspNetCore.Authentication.JwtBearer
2. Configure the JWT in Startup.cs: In the ConfigureServices method, add the configuration for the JWT:public voidConfigureServices(IServiceCollection services){
services.AddAuthentication(JwtBearerDefaults.AuthenticationScheme)
.AddJwtBearer(options =>
{
options.TokenValidationParameters = new TokenValidationParameters
{
ValidateIssuer = true,
ValidateAudience = true,
ValidateLifetime = true,
ValidateIssuerSigningKey = true,
ValidIssuer = "yourissuer",
ValidAudience = "youraudience",
IssuerSigningKey = new SymmetricSecurityKey(Encoding.UTF8.GetBytes("your_secret_key"))
};
});
services.AddControllers();
}3. Dodajte Autentifikaciju u Configure Metodu:public voidConfigure(IApplicationBuilder app, IWebHostEnvironment env)
{
if (env.IsDevelopment())
{
app.UseDeveloperExceptionPage();
}
else
{
app.UseExceptionHandler("/Home/Error");
app.UseHsts();
}
app.UseHttpsRedirection();
app.UseStaticFiles();
app.UseRouting();
app.UseAuthentication();
app.UseAuthorization();
app.UseEndpoints(endpoints =>
{
endpoints.MapControllers();
});
}Authorization controls access to resources based on user roles or policies.
How to Implement Authorization:
Define Policies: In Startup.cs, in the ConfigureServices method, add:services.AddAuthorization(options =>
{
options.AddPolicy("AdminOnly", policy => policy.RequireRole("Admin"));
});Use Policies in Controllers:[Authorize(Policy = "AdminOnly")]
[ApiController]
[Route("[controller]")]
public classAdminController : ControllerBase
{
// Actions
}3. Data Protection. To protect data, use SSL/TLS encryption for secure data transmission and protection against attacks such as SQL injections or Cross-Site Scripting (XSS).
How to Configure SSL/TLS:
- Binding SSL/TLS in appsettings.json:
"Endpoints": {
"Https": {
"Url": "https://localhost:5001",
"Certificate": {
"Path": "path_to_your_certificate.pfx",
"KeyPassword": "your_certificate_password"
}
}
}
}Binding HTTPS in Startup.cs:public voidConfigure(IApplicationBuilder app, IWebHostEnvironment env)
{
app.UseHttpsRedirection();
// other middleware
}
Additional Resources
For further learning and exploration, here are some useful resources and documentation:- ASP.NET Core Documentation
- JWT Authentication
- SSL/TLS Configuration
- Dapper Documentation
- Performance Optimization
These resources will help you advance your knowledge and skills in creating secure and efficient web API services.
| Previous |<Servicing static web pages using a web server |
Next Creating a controller in an asp.net web API application>| |