
BASICS OF PROCESSING USING JAVA PROGRAMMING LANGUAGE
Drawing basic geometric shapes in processing
In order to draw the basic shapes: line, ellipse (circle) and rectangle, you need to create a new sketch, add setup and draw methods, and then do the following:Adjust the screen size, background color, colors for drawing contour lines in the setup method (performed once) (can also be done in the draw method):
voidsetup()
{
Inside the draw method, define the fill colors for the circle and rectangle and then draw them:{
size(600,600); //size of canvas
background(200,50,30);
stroke(255); //color of the line
}background(200,50,30);
stroke(255); //color of the line
voiddraw()
{
Read more about drawing basic shapes in the original processing tutorial:{
line(125,100,300,400); //draws a line between points A(125,100) and B(300,400)
fill(color(200,45,255)); //fill color for the circle
ellipse(200,200,50,50); //draw the circle
fill(25,45,200); //fill color for the rectangle
rect(300,300,100,50); //drawing a rectangle
}fill(color(200,45,255)); //fill color for the circle
ellipse(200,200,50,50); //draw the circle
fill(25,45,200); //fill color for the rectangle
rect(300,300,100,50); //drawing a rectangle
https://processing.org/tutorials/overview/#overview
After starting:
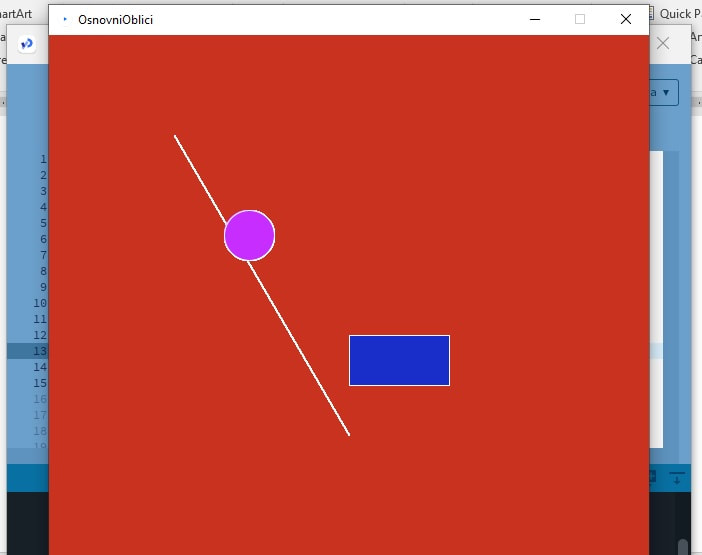
Figure 1: Processing Java - creation of basic geometric shapes
Creating basic geometric shapes from scratch
Let's start processing 4 and create a new sketch with the name "MovingBallHorizontal" and add two modified setup and draw methods.Inside the setup method we will initialize the variables and set the initial settings. The scatch size is set to 400,400.
In order to be able to move the ball along the X axis, we will introduce the variable x and give it an initial value of zero.

Figure 2: Processing Java example - Horizontal Ball Movement
Given that the setup method is called only once, and the draw method every frameRate seconds, we only set the initial settings inside the setup method, while everything that needs to be repeated is placed inside the draw method.Before drawing a circle using the ellipse method, the background color (background(0), in this case black) is drawn, the color of the lines is set to (red) and the thickness of the lines to (2px). Read more about colors on the website of processing: processing.org/tutorials/colorIn this example, the variable frameRate is defined, although there is also processing (defined in the inherited PApplet) class and its value depends on the computer, and usually has a value of 30 or 60, which means that if it is changed to 20, such as in the shown example, the number of calls to the draw method is 20 times per second (change time dt=0.05s).
The initial drawing of the circle is in the middle of the frame, i.e. at coordinates (width/2, height/2). If we add the value of variable x to width/2, as in the example, the ball will move by as much as the value of that variable in the current call to the draw method.
In order for this ball to move, we need to change the x variable over time (x +=2).
If we start the application, we will see the movement of the ball in the x direction and in the positive direction, as shown in the following image:

Figure 3: Processing Java example - Horizontal Move Ball launch
In order for the movement to more realistically represent the movement, as it is in nature, RATIO was introduced, which represents the ratio of the number of pixels that represent the width of the frame to the number of meters in nature that would be displayed by this animation. Ordx += 2
has been replaced
x +=(velocity/frameRate)*RATIO
If a variable is introduced that represents the speed of movement, for example 1m/s, then the change in length would be by 1, but by 1s, and since the time between 2 calls to the draw method frameRate is times less, then the change in length is x for velocity/frameRate.
This would be a change in meters, and to get it in pixels, this value should be multiplied by RATIO.
Adding conditions
In order for the ball to bounce off the right and left "walls", when it reaches the end of the frame and changes the direction of movement, it is necessary to add conditions
if(x > width-50 || x < 0)
{
So the code should now be:{
velocity*= -1;
}
Figure 4: Processing Java example - Horizontal Move Ball with conditions
Programming the movement of the ball in the XY plane in an object-oriented manner
Now let's transform the previous example with the use of classes and objects, that is, following the principles of object-oriented programming.Inside the setup method we will initialize the objects and set the initial settings. We will create a ball object. The declaration of object l1(ball) is outside the method.
float x;
int frameRate=20;
float velocity=5;//m/s
static final float SCALE=40;//40px=1m
Ball ball1;
void setup (){
Let's open a new tab and create a new sketch named "Ball". Inside it we create a class with the same name:int frameRate=20;
float velocity=5;//m/s
static final float SCALE=40;//40px=1m
Ball ball1;
void setup (){
size(400,400);//10m * 10m in the nature
}
Let's create a Ball class and transfer all the data and methods related to the ball there:

Figure 5: Processing Java example - Horizontal Ball Movement. Ball Class
Here we see the attributes, the constructor as well as the "move" method, which is used to move the ball in one iteration (changing the state between two frames). The move method can be added later when moving to the implementation of the ball movement.Inside the main sketch, you should add the move() function call inside the draw method, as can be seen in the following code:

Figure 6: Processing Java example - Horizontal Ball Movement. MovementCircleXYObjectOriented
The ball is created by calling the constructor with parameters and passing the radius and coordinates of the position of the square in which the ball is written.There are no significant changes in the following code except that the attributes of the ball object are accessed via the ball1 object.
It is left to the reader to independently add the Y-axis movement as well as the necessary conditions, so that the ball bounces off the top and bottom edges of the frame.
Exporting the application in processing
In order for the application to be started outside the PDE environment, it needs to be exported, and this can be done with the following command:File -> Export Application
| Previous |< Introduction to Processing |
Next Processing and microbit >| |