
Introduction to arduino
Arduino is an open-source electronics platform based on easy-to-use hardware and software. It's designed to make electronics more accessible for hobbyists, students, artists, engineers, and anyone interested in creating interactive devices.At its core, Arduino is:
- A microcontroller board (the hardware)
- An integrated development environment (IDE) where you write and upload code (the software)
Arduino consists of:
- ✅ An Arduino board (like Uno, Mega, Nano — these are different models)
- ✅ Arduino IDE (software used to write/upload code)
- ✅ Libraries & community support (tools and code to expand functionality)
- ✅ Accessories (sensors, motors, LEDs, etc. — optional but often used)
Arduino Uno is the most popular. It's a small board with microcontroller that can receive some data from external and it can manage some input and output engines.
The second thing which is necessary is Arduino IDE this is a the development environment for writing some program or sketches. These programs are written in a programming language similar to c or c ++.
How does Arduino work?
He connects the sensors and actuators. Arduino collect some information from sensors like physical quantities such as temperature humidity of soil, acceleration and the light intensity .The examples of projects with Arduino
- Turning on the lights in the darkness(Automatic light): In this project LED lights should be turning on when the light intensity dropped below some limits. The microcontroller on the Arduino boards collect information about light intensity from the light sensor. Then the microcontroller send some signal that the lights will be turning on.
- Thermometer: The temperature sensor read some data about temperature in the environment and send this data to LCD display
- Smart alarm: When the PIR sensor detect movement the siren is activated
- Joystick mini robot: The robot use sensors to avoid obstacles.
- Smart watering of plants: The moisture sensor in the soil detect when you should start the watering plants
- Camera control: The servo motor move the camera left or on the right according to movement sensor
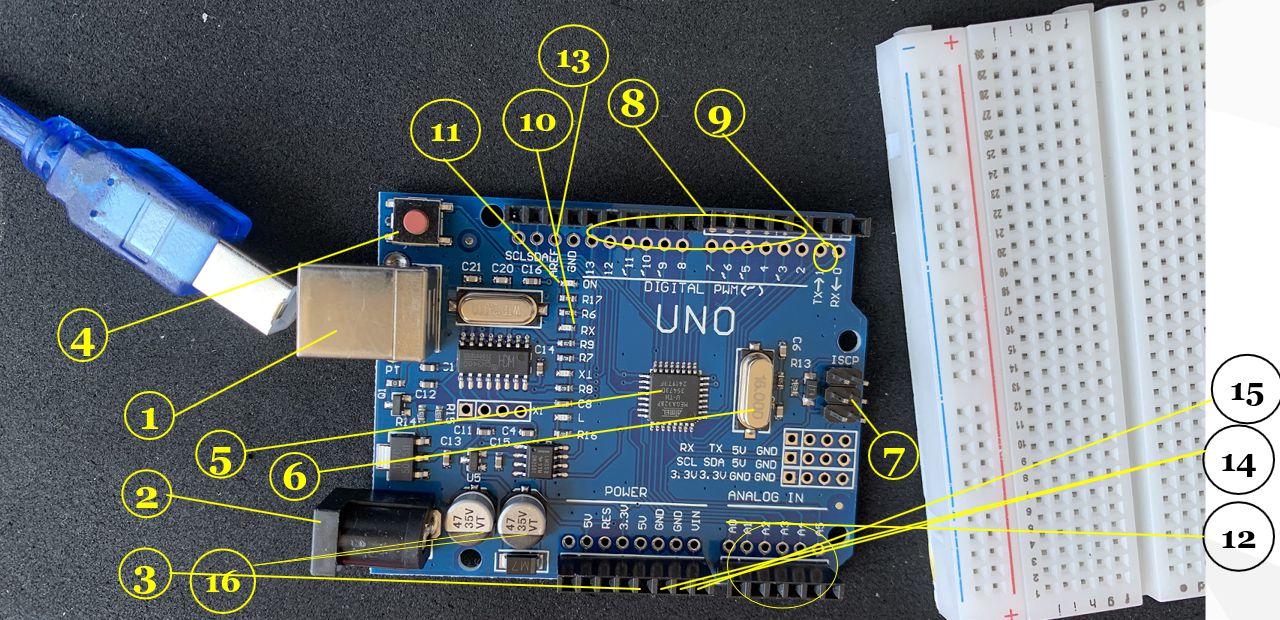
The Arduino Uno parts
Video lesson
Understanding the Arduino Uno Board
The Arduino Uno is a microcontroller board based on the ATmega328P chip. It is a popular choice for beginners and professionals in electronics, robotics, and programming. The Uno is designed to make working with microcontrollers easy and accessible. It consists of several key components, each with its specific function and useMain Components of Arduino Uno and Their Functions
Here is a brief overview of the key components on the Arduino Uno board (based on the previous image):
- USB Connector (top left)
Used for programming the board and providing power from a computer. - DC Jack (Power Jack) (top right)
Allows connection to an external power supply (7–12 V). - 5 V and 3.3 V Header Pins (to the right of the power jack)
Provide regulated voltages to power sensors and modules. - Reset Button (between the USB and power jack)
Resets the microcontroller, interrupting and restarting the running program. - ATmega328P Microcontroller (center of the board)
The main chip that runs your program. - 16 MHz Crystal Oscillator (near the microcontroller)
Provides the clock signal for the ATmega328P operation. - ICSP Header (below the crystal)
Used for in-system programming (ISP) of the microcontroller. - Digital Input/Output Pins D0–D13 (top right row of pins)
Can be configured as inputs or outputs; some support PWM. - TX and RX Pins (pins 1 and 0)
- Pin 1 (TX) – Transmit: Arduino sends data from this pin.
- Pin 0 (RX) – Receive: Arduino receives data on this pin.
- TX/RX LEDs (next to digital pins D0–D1)
Indicate serial communication (data being sent or received). - Power LED (near the reset button)
Shows that the board is powered on. - Analog Inputs A0–A5 (bottom left row of pins)
Used to measure analog values (0–5 V). - AREF Pin (next to analog inputs)
Reference voltage for the analog-to-digital converter. - GND Pins (distributed across the board)
Common ground (0 V) for all devices. - Vin Pin (near the GND pins)
Allows direct power input to the board with the same voltage as the DC jack. - Electrolytic Capacitors
They are used for:- Power stabilization – smooth out voltage fluctuations (e.g. from the power jack)
- Noise filtering – remove electrical noise from power lines
- Energy buffering – provide extra power during sudden load changes
What is a Clone Arduino Uno R3?
A clone board is not made by the original Arduino team (Arduino.cc), but it’s built to the same specifications and usually works the same way.
Pros:
- Much cheaper than the original
- Works for most educational or hobby purposes
Cons or things to watch out for:
- Lower build quality (soldering, connectors, reset button)
- May use different USB chip (often CH340 instead of ATmega16U2)
- Might not be tested as strictly as originals
- Drivers might not install automatically
Tips & Advice When Using Clone Arduino Uno R3:
1. Check the USB-to-Serial Chip
- Originals use ATmega16U2
- Clones often use CH340G or CP2102
- You may need to manually install drivers (especially for CH340G)
Tip: Search for “CH340G driver download” if your PC doesn’t recognize the board.
2. Inspect Build Quality
Check the solder joints, pin alignment, and connectors. Weak connectors may break with frequent use.
3. Power Supply Limitations
Some clones might not regulate voltage properly. Don’t push them close to 12V if they get hot.
4. Use Arduino IDE Normally
Select "Arduino Uno" as the board in the IDE. Upload sketches like you would with the original.
5. Test the Bootloader
Some clones may have a bad bootloader or no bootloader at all. If uploads fail, you might need to reburn the bootloader using another Arduino as ISP.
6. Avoid Critical Applications
For learning, hobby, or prototyping: □ Clone is fine.
For professional or critical use: □ Prefer the original Arduino board for better reliability.
Summary Table:
| Item | Original Uno | Clone Uno |
|---|---|---|
| Price | Higher | Lower |
| USB Chip | ATmega16U2 | CH340G, CP2102 |
| Driver Needed | No | Sometimes Yes |
| Build Quality | Excellent | Varies |
| Arduino IDE Compatibility | Full | Full |
| Suitable for Learning | Yes | Yes |
| Suitable for Production | Yes | With caution |
If you want, I can help you identify a clone board visually or give you steps to install CH340G drivers.
Connecting Arduino to other programs – examples and introduction
One of the biggest advantages of the Arduino platform is the ability to communicate with other software tools via the serial port (Serial). This communication allows information from sensors and devices to be displayed, analyzed or visualized in real time on a computer. In this tutorial we will focus on connecting the Arduino UNO board to the Processing program.Processing is a programming language and development environment based on Java (there is also a JavaScript version - p5.js) that is used for:
- Graphic animations
- Interactive visualizations
- Education and art projects
- Display and processing of data in real time
How does communication work?
Arduino and Processing communicate via a serial port (USB). The procedure is as follows:- Arduino sends sensor data (eg temperature, light, distance) via serial port.
- Processing reads that data and uses it to display animations, drawings or graphs in real time.
Examples of use
□ 1. Light level display (LDR sensor)
• Light values from the LDR sensor are displayed as an interactive visual bar or circular scale in Processing.
• The color of the screen changes according to the brightness of the room.
□ 2. Graphic display of temperature in real time
• The Arduino uses a DHT11 sensor to measure the temperature.
• Data is sent every half second via the serial port.
• Processing displays the temperature as a moving line graph.
□ 3. Interactive robot in Processing
• The ultrasonic sensor measures the distance.
• Based on the distance, Processing displays a graphic robot that approaches or moves away from the object.
□ 4. Control the game with movements
• Arduino uses gyroscope or joystick.
• Motions are transferred to Processing and used to control objects in the mini-game (eg moving a ball or a car).
□ 5. Visualization of a smart room
• Sensors for temperature, light and presence in the space.
• Processing draws a map of the room in which the state is displayed visually (eg light on, window open, heater active...).
Next
Light level display (LDR sensor) >|