
Branching on the micro:bit: if, the Logic palette and the compass
So far in the tutorials for the Micro:bit device we have used sequential statements, which are executed one after another in a certain order. However, in programming there is often a need for the program to choose between two or more possible directions of execution, depending on certain conditions. This situation is called branching in a program.
Branching allows the program to "branch" based on given logical conditions. For example, if a condition is true, the program can execute one sequence of statements; otherwise, it will execute another sequence.
Control statements are key for making such decisions and allow more flexible and more complex flows in programs. These statements define how the program will "control" the flow of its execution.
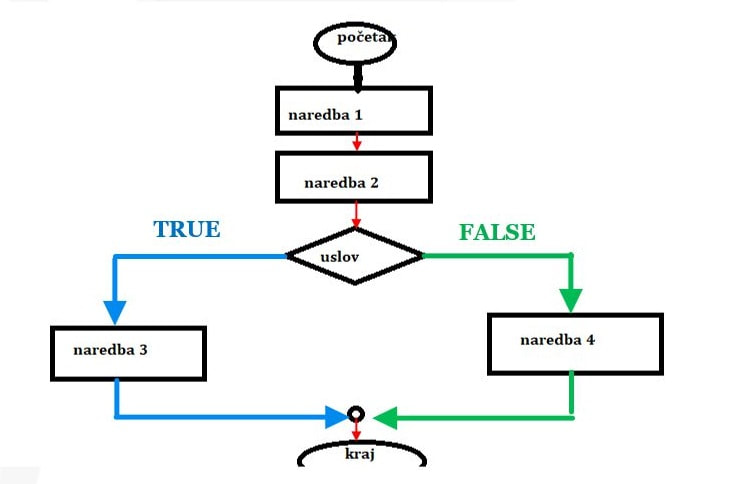
Algorithmically, branching in a program can be shown with a flowchart. The following picture shows the basic principle of branching:
Example 1: Measuring temperature on the micro:bit
Make a program on the Micro:bit device that reacts to the current temperature in the room. The program should check the temperature value and, based on it, show the corresponding symbol on the screen:
- If the temperature is greater than or equal to 25°C, the Micro:bit screen should show an arrow pointing up (↑).
- Otherwise, when the temperature is less than 25°C, the screen should show an arrow pointing down (↓).
This task uses branching statements to decide which symbol to show based on the condition.
Solution
- Open the Microsoft MakeCode editor.
- Add blocks from the Input category for reading the current temperature from the built-in sensor of the Micro:bit device.
- Use a block from the Logic category to create a conditional statement (if-else). In it, check whether the temperature is greater than or equal to 25°C.
- In the "if" part, add a block from the Basic category that shows an arrow pointing up (↑).
- In the "else" part, add a block that shows an arrow pointing down (↓).
- Download the code to the Micro:bit and test the program in real conditions.
Video solution
(The video is in Serbian.)
Branching in a program with 3 or more branches
So far we have shown branching of a program into two branches, when the flow of the program is divided into two possible flows of execution, and where the branching was done with a condition, i.e. a logical expression that has two possible values: true (true) or false (false).
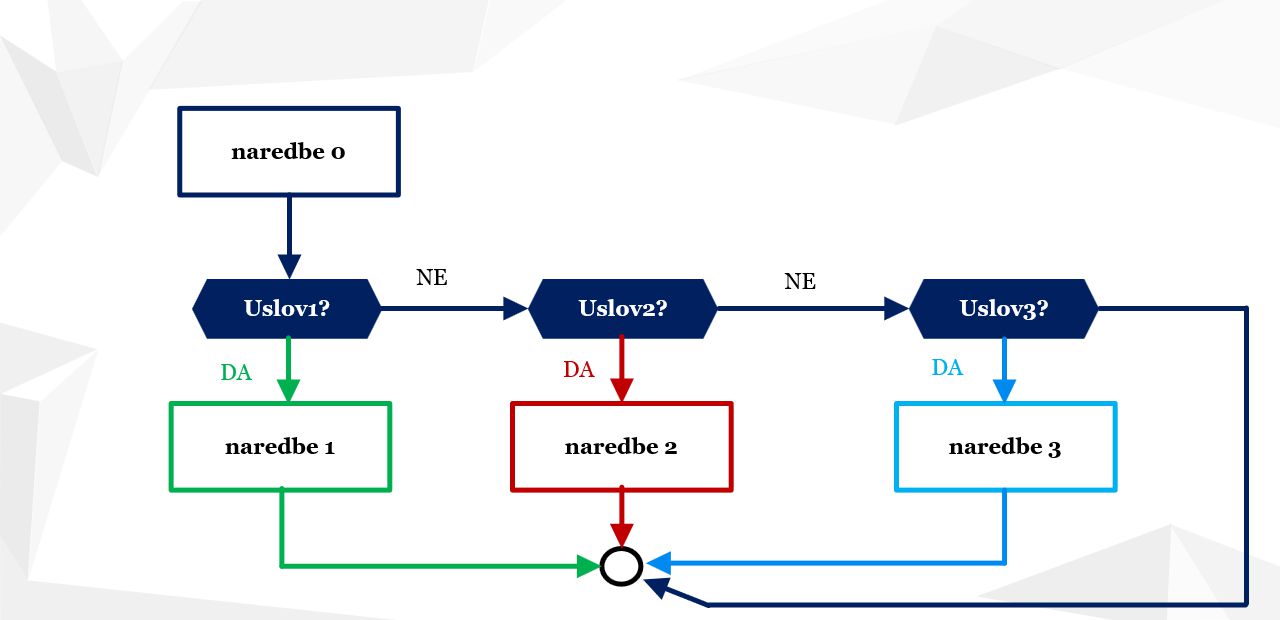
There are tasks where, instead of branching into two branches, we need to branch into 3, and sometimes even more branches. One condition is not enough for this branching; it can be done with two or 3 conditions, as shown in Figure 2. Every condition determines two new branches (flows), which you can see in the picture.
Example 2a: A survey of favourite subjects with the micro:bit
Make a program for the micro:bit that makes it possible to survey one user. The user should vote for their favourite subject.
The example uses two subjects: mathematics and geography. The user should be able to use 3 "buttons" on the micro:bit:
- Button A: Increases the number of votes for the subject "Geography"
- Button B: Increases the number of votes for the subject "Mathematics"
- Shaking the micro:bit: Shows the first letter of the subject and the number of points
The video below shows the use of statements from the Logic palette on the MakeCode platform (the video is in Serbian). The example described and shown in the video is a program for surveying users, with the question: What is your favourite subject at school?
In this example we get 3 variants of program execution based on 3 possibilities:
- Button A is pressed
- Button B is pressed
- The micro:bit is shaken (On Shake)
The attached (previous) video explains how to solve the complete task, and below there is a modified version of the task (see task 2b below!)
Example 2b: A survey of favourite subjects with the micro:bit, showing the survey results
This example demonstrates how to use the micro:bit to carry out a survey about favourite school subjects. The goal is to collect votes and show the results using branching and the buttons on the micro:bit device.
Task description: the program should allow users to vote for one of two offered subjects:
- Button A: a vote for Mathematics.
- Button B: a vote for History.
When the voting is over, the micro:bit will analyse the collected votes and show which subject won more votes.
Instructions for solving
- Preparing the variables
At the beginning of the program, define two variables that will count the votes for each subject, e.g. mathematics and history. - Counting the votes
In the program, use the functions that react to button presses:- When button A is pressed, increase the value of the variable mathematics by 1.
- When button B is pressed, increase the value of the variable history by 1.
- Showing the result
After all users have finished voting, press buttons A+B at the same time to show the result:- If mathematics > history, show the message "Mathematics won!".
- If history > mathematics, show the message "History won!".
- If the votes are equal, show the message "Draw!".
Solution in JavaScript
let mathematics = 0
let history = 0

// Counting the votes for Mathematics
input.onButtonPressed(Button.A, function () {
    mathematics += 1
})

// Counting the votes for History
input.onButtonPressed(Button.B, function () {
    history += 1
})

// Showing the result
input.onButtonPressed(Button.AB, function () {
    if (mathematics > history) {
        basic.showString("Mathematics won!")
    } else if (history > mathematics) {
        basic.showString("History won!")
    } else {
        basic.showString("Draw!")
    }
})
Explanation
- Branching and decisions:
The function onButtonPressed is used to track the event when the user presses a certain button. Branching (if statements) makes it possible to decide which subject has more votes. - Input and output:
- Input: Pressing buttons A and B.
- Output: Messages shown on the LED screen of the micro:bit.
- Interactivity:
The micro:bit allows users to take an active part in the survey and see the result immediately.
Testing
- Run the program on the micro:bit device.
- Click buttons A and B several times to simulate voting.
- Press buttons A+B to show the result and check whether the program analyses and shows the votes correctly.
The Logic palette
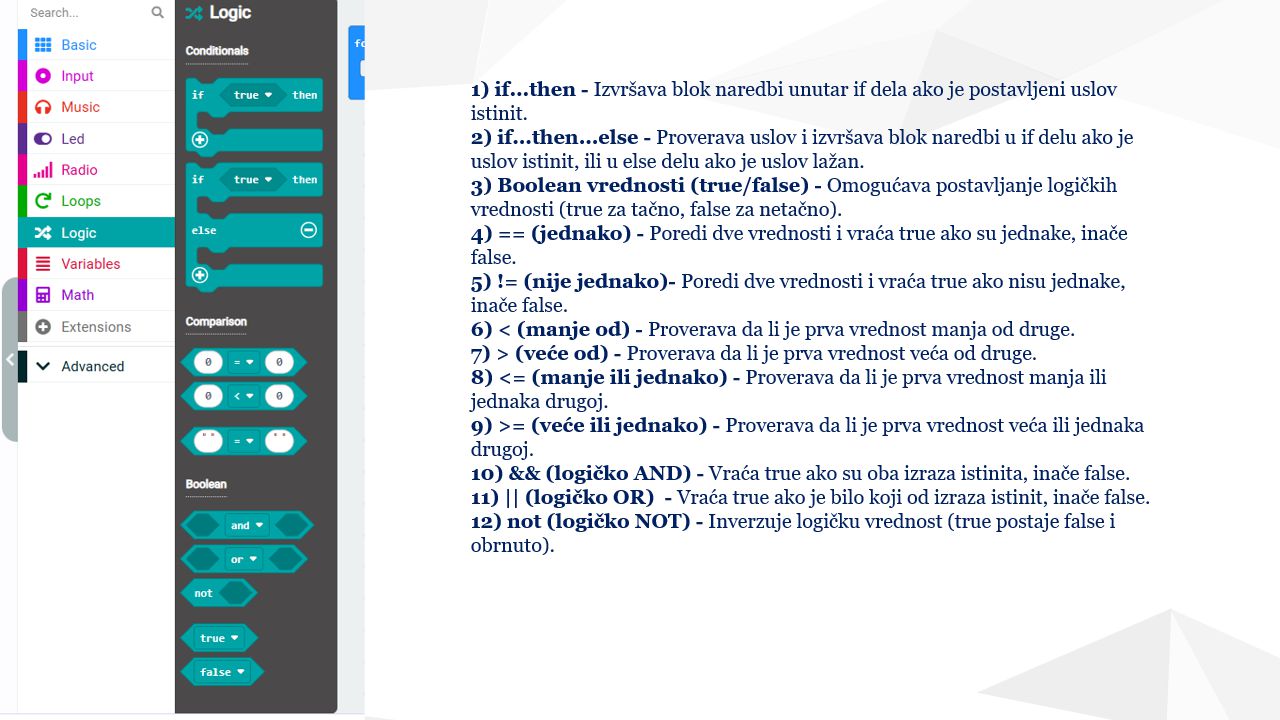
Examples of using the commands from the Logic palette
- if...then (Executes the block of statements inside the if part if the given condition is true.)
Example: If the temperature is higher than 25°C, show the sun icon. 2. if...then...else (Checks the condition and executes the block of statements in the if part if the condition is true, or in the else part if the condition is false.)
Example: If button A is pressed, show "A", otherwise show "B".
3. Boolean values (true/false) (Allows setting the logical values true and false.)
Example: The variable state determines whether the text "YES" is shown.
4. == (equal) (Compares two values and returns true if they are equal, otherwise false.)
Example: If the current temperature is equal to 20°C, show "20C".
5. != (not equal) (Compares two values and returns true if they are not equal, otherwise false.)
Example: If the current temperature is not 20°C, show "Not 20".
6. < (less than) (Checks whether the first value is less than the second.)
Example: If the temperature is lower than 15°C, show the snow icon.
7. > (greater than) (Checks whether the first value is greater than the second.)
Example: If the number of turns is greater than 10, show "Done".
8. <= (less than or equal) (Checks whether the first value is less than or equal to the second.)
Example: If the number of turns is less than or equal to 5, show "OK".
9. >= (greater than or equal) (Checks whether the first value is greater than or equal to the second.)
Example: If the number of steps is greater than or equal to 100, show "Goal reached".
10. && (logical AND) (Returns true if both expressions are true, otherwise false.)
Example: If the temperature is higher than 20°C and lower than 30°C, show "Ideal".
11. || (logical OR) (Returns true if any of the expressions is true, otherwise false.)
Example: If button A or button B is pressed, show "Click".
12. not (logical NOT) (Inverts a logical value; true becomes false and vice versa.)
Example: If button A is not pressed, show "No press".
Project for independent work: A survey of favourite subjects with the micro:bit and radio
In this project we will create a system for surveying favourite subjects using several micro:bit devices. Two micro:bits will be used as voting devices (senders), and one micro:bit will be a receiver that collects and shows the results of the survey. The votes are sent over the radio, and each voting device represents one subject.
Steps for building it
- Configuring the radio connection:
All micro:bit devices must be set to the same radio group so that they can communicate with each other. - Sender for Mathematics:
This micro:bit sends the message "Mathematics" to the receiver every time a student presses button A. - Sender for History:
This micro:bit sends the message "History" to the receiver every time a student presses button B. - Receiver:
The receiver receives the messages from both senders, counts the votes for each subject and shows the results on the screen.
Possible extensions
- Adding more senders for additional subjects.
- Saving the results on the receiving micro:bit for later analysis.
- Visualizing the results on the LED screen (e.g. counting dots for each vote).
Compound conditions
Compound conditions are useful when we want to combine two or more simple conditions to define a compound criterion that must be met. On the micro:bit we can use the logical operators AND, OR and NOT to make such combinations.
For example, if we want to determine whether an angle is in the first quadrant, we can set two conditions:
- The angle is greater than 0 degrees.
- The angle is less than 90 degrees.
By combining these two conditions with the operator AND, we can check whether both are true at the same time:
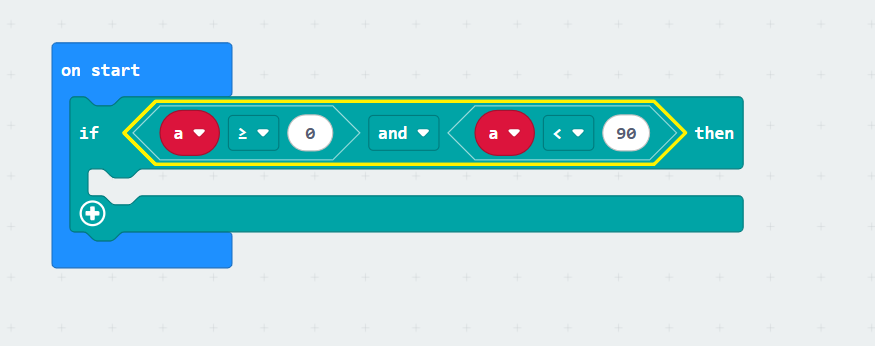
The same program in JavaScript (MakeCode):
let a = 0
if (a >= 0 && a < 90) {
    // here go the statements executed when BOTH conditions are true
}
A compound condition in Python (MakeCode)
angle = 45
if angle > 0 and angle < 90:
    basic.show_string("1Q")  # shows "1Q" if the angle is in the first quadrant
Here the condition angle > 0 and angle < 90 guarantees that the code will be executed only when both conditions hold. If one of the conditions is not met, the result of the compound condition will be False, and the micro:bit will not show "1Q".
Logical "or"
On the other hand, we can look at the requirement to check that the angle is not in the first quadrant, i.e. that the angle is less than zero or greater than 90. The code would be as in the picture below:
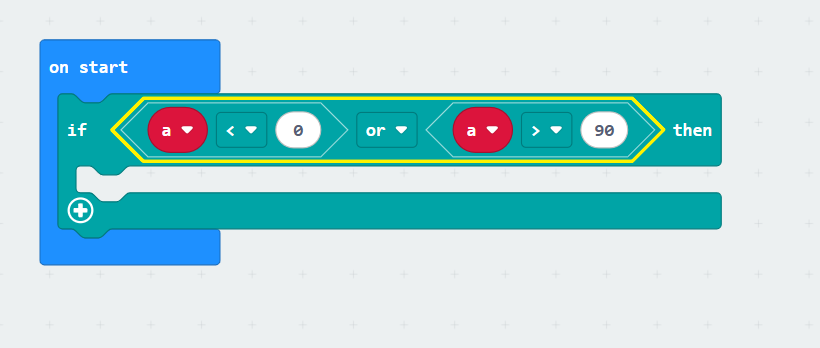
The same program in JavaScript (MakeCode):
let a = 0
if (a < 0 || a > 90) {
    // here go the statements executed when AT LEAST ONE condition is true
}
or in Python if angle <= 0 or angle >= 90:
basic.show_string("Not in the first quadrant (1Q)")
The logic of compound conditions
Compound conditions are used for making decisions based on several criteria at the same time. They combine two or more simple conditions using logical operators such as "and" (AND) and "or" (OR).
- The logical operator "and" (AND): The compound condition is true only if both conditions are true. If at least one condition is false, the whole compound condition becomes false.
Example: If you want to pass an exam, you must have more than 50 points and be present at the test. - The logical operator "or" (OR): The compound condition is true if at least one of the conditions is true. The whole condition becomes false only if both conditions are false.
Example: If you want to attend an event, you can show either a ticket or an ID card.
A concrete everyday example: buying a cinema ticket. Imagine that you want to go to the cinema and the rule is that you can buy a ticket if you meet one of the following conditions:
- You have a cinema membership card.
- You have a student discount.
This rule can be written as a compound condition:
- If you have a membership card or a student discount, you can buy a ticket.
In pseudocode:
if (membership_card == true OR student_discount == true):
show "You can buy a ticket"
else:
show "You are not allowed to buy a ticket" If you have a membership card, the result will be true and you can buy a ticket, regardless of the student discount. Similarly, if you have a student discount, the result will again be true. Another example: a security check. At the entrance to a building, two conditions are needed for entry:
- That you have an ID card.
- That you are on the list of visitors.
This would be a condition with the logical "and" (AND):
if (has_card == true AND on_list == true):
show "Access granted"
else:
show "Access denied" If you are missing either of the conditions (card or list), you will not be allowed to enter.
Conclusion
These examples show how the logical operators "and" and "or" work in real life, which makes them easier to understand. They are used to make decisions based on multiple criteria, which makes them key in programming and in everyday situations.
Compass
The compass on the micro:bit device is a sensor that allows the device to detect the direction it is facing relative to magnetic north. This sensor is basically a magnetometer that measures the strength and direction of the magnetic field. The compass on the micro:bit is used for applications such as tracking direction, navigation and orientation in space. What is compass calibration for? Compass calibration is the process of adjusting the sensor so that it measures magnetic forces precisely. This is needed because the magnetometer can be disturbed by local magnetic fields or metal objects nearby.
Calibration is usually started on the micro:bit when the sensor is activated for the first time or if an inaccuracy is detected. During calibration, the micro:bit asks the user to tilt the device in different directions so that the measurements are optimized for accurate readings in all orientations. An animation or a message usually appears on the micro:bit screen to guide the user through the process.
When should you use calibration?
- When the micro:bit does not read the direction precisely.
- After significant changes in the environment (for example, being near electronic devices or magnets).
- When the compass is used in a new application or project.
Examples of using the compass on the micro:bit:
- Navigation: Making a program that shows an arrow pointing north.
- Games and experiments: Using the compass to detect rotations and directions in games.
- Tracking direction: Creating applications that react to changes of orientation.
Example 3: Finding the compass directions with the compass
Make a program for the micro:bit that uses the built-in compass to measure the direction and shows the corresponding compass direction. Based on the measured direction:
- If the direction is between 0° and 44° or between 315° and 360°, the screen should show the text "N" (North).
- If the direction is between 45° and 134°, "E" (East) is shown.
- If the direction is between 135° and 224°, "S" (South) is shown.
- If the direction is between 225° and 314°, "W" (West) is shown.
The compass must first be calibrated so that it can read the direction precisely. Instructions for solving:
- Setting up the basic environment:
- Start the micro:bit editor (e.g. MakeCode).
- Create a new project.
- Calibrating the compass:
- Use the function input.calibrate_compass() in Python (or the corresponding option in the MakeCode blocks).
- When the program starts the calibration, move the micro:bit in all directions until the calibration is finished.
- The logic for reading the direction:
- Use the function input.compass_heading() to get the value of the direction in degrees.
- Add conditions for showing the text "N", "E", "S" or "W" based on the direction read.
- Showing the text:
- Show the text on the micro:bit screen using the function basic.show_string() or the corresponding option in the blocks.
Solution
What is the azimuth and how is it determined on the Micro:bit?
The azimuth is the angle between the north direction on the horizon and the direction towards some point, measured clockwise from 0° to 360°. This value is used to determine orientation in space and is common in navigation, astronomy, geography and military applications.
On the BBC Micro:bit, the azimuth is determined using the built-in magnetometer (compass), which measures the Earth's magnetic field. Based on these measurements, the Micro:bit can determine the direction relative to north. The process includes the following steps:
- Calibrating the compass: Before the Micro:bit starts measuring the azimuth, the magnetometer needs to be calibrated. During calibration, the user is shown animations on the LED screen, and the device should be rotated in all directions so that all magnetic forces are registered and local magnetic disturbances are eliminated.
- Measuring the angle: After calibration, the Micro:bit can measure the azimuth according to the current position of the device. The built-in function compass.heading() returns the value of the angle between the direction of the device and magnetic north.
- Showing the result: Based on the computed angle, the azimuth can be shown on the LED screen, or it can be used for further computations, such as identifying the compass direction (e.g. north, east, south, west).
- The Micro:bit makes learning about the azimuth easier through simple programming frameworks, allowing students and users to experiment with the concept of geographical orientation in a practical way.
The solution of the task is shown in the picture below:
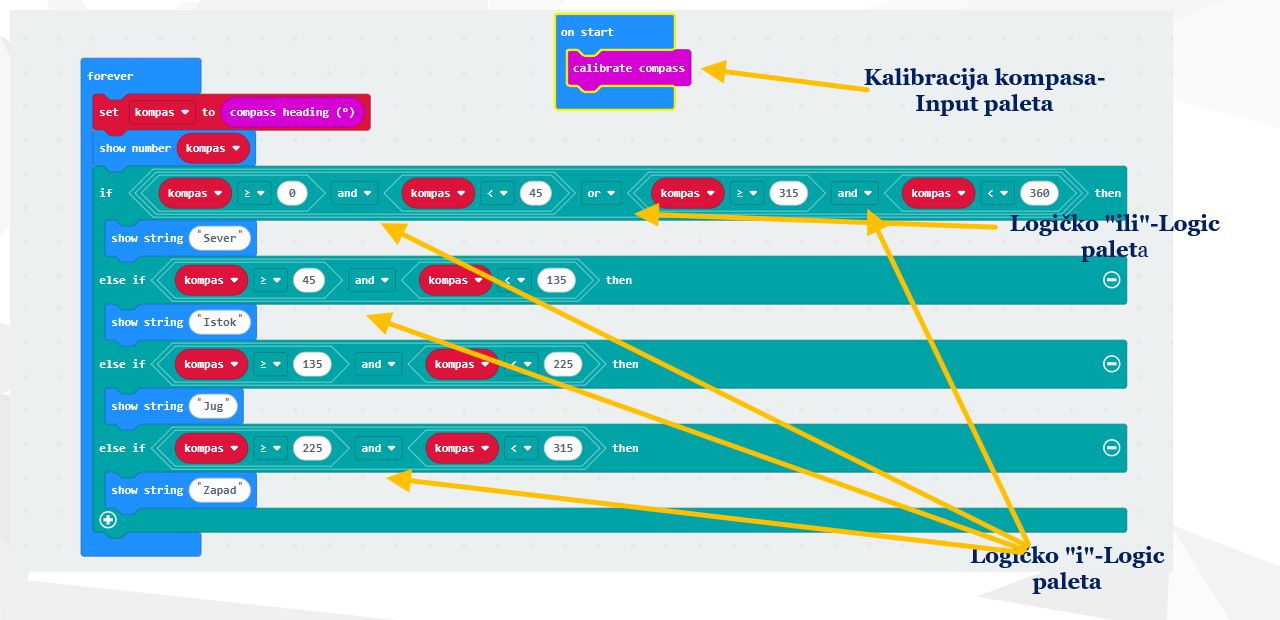
The same program in JavaScript (MakeCode):
let compass = 0
input.calibrateCompass()   // calibrating the compass (Input palette)

basic.forever(function () {
    compass = input.compassHeading()   // angle from 0 to 359 degrees
    basic.showNumber(compass)
    if (compass >= 0 && compass < 45 || compass >= 315 && compass < 360) {
        basic.showString("North")
    } else if (compass >= 45 && compass < 135) {
        basic.showString("East")
    } else if (compass >= 135 && compass < 225) {
        basic.showString("South")
    } else if (compass >= 225 && compass < 315) {
        basic.showString("West")
    }
})
See the complete explanation of the task in the following video:
Additional examples for independent work
1. Showing the quadrant
Task: Make a program that shows which quadrant the current angle read from the compass is in (first, second, third, fourth). The screen should show the number of the quadrant (1, 2, 3 or 4).
Instructions:
- Divide the azimuth into four ranges:
- First quadrant: 0° ≤ angle < 90°
- Second quadrant: 90° ≤ angle < 180°
- Third quadrant: 180° ≤ angle < 270°
- Fourth quadrant: 270° ≤ angle < 360°.
- Use the logical operator AND to define the conditions for each quadrant.
- Show the corresponding quadrant number on the LED screen.
2. Comparing the azimuth
2. Comparing the azimuth
Task: Check whether the compass is pointing north (azimuth less than 45° or greater than 315°) and show "✔" if it is, or "✘" if it is not.
Instructions:
- Use the logical operator OR to connect the two conditions.
- Set up the display in a loop so that the Micro:bit checks the orientation continuously.
3. Turn indicator
Task: Program the Micro:bit to show an arrow to the right if the angle is between 90° and 180°, and to the left if it is between 180° and 270°.
Instructions:
- Define two compound conditions using the logical operator AND.
- Use the LED matrix to show the arrows.
4. Sending the azimuth over the radio
Task: Make a program on two Micro:bits. The first reads the azimuth and sends it over the radio, while the second shows the azimuth on the screen.
Instructions:
- On the first Micro:bit:
- Set the radio channel (radio.setGroup()).
- Use radio.sendValue() to send the azimuth read.
- On the second Micro:bit:
- Receive the value over the radio using radio.onReceivedValue().
- Show the value on the LED screen
5. Target proximity indicator
5. Target proximity indicator
Task: Program the Micro:bit to check whether the angle is less than 10° away from the desired direction (e.g. north). If it is, let it show a "target" icon, otherwise let it show an arrow in the direction of the necessary turn.
Instructions:
- Use the absolute value of the difference between the azimuth read and the target angle (Math.abs()).
- Add logical conditions for showing the left/right arrows
Check your knowledge
Open the quiz
Branching, the Logic palette and the compass
1. Is the condition a >= 0 and a < 90 true for a = 90?
2. When is a condition with or true?
3. What is else if for?
4. What angle does compass heading return when the micro:bit faces east?