
Variables and the Math palette in micro:bit projects
In this tutorial students will get to know the basic concept of variables in programming. Through a series of interesting activities, they will learn how to create and use variables as symbolic names for memory locations, which makes it possible to manage data efficiently. Students are free to name the variables as they like, with the recommendation that the names are clear and describe the content stored in the variables.
At the end of the lesson, all the work will be presented, which creates an opportunity for commenting on each other's work, giving suggestions and exchanging ideas.
A reminder: creating variables (variables)
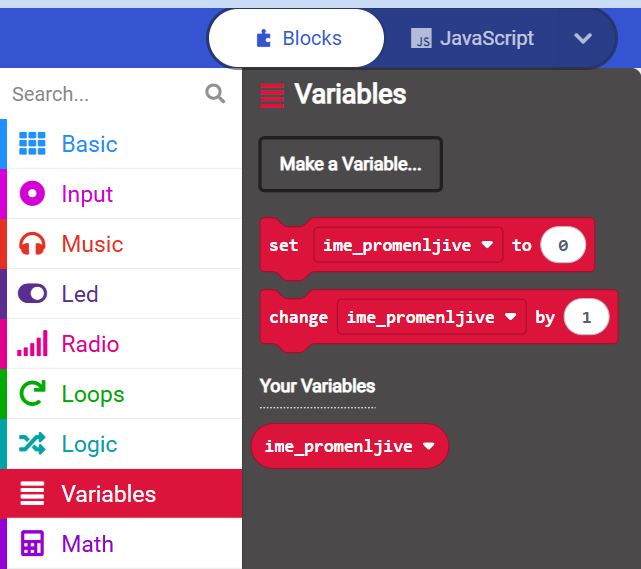
To create variables we use the Variables palette. First a variable with some name is created with the command make variable, and then the commands for setting the value of the variable and for changing the value of the variable become available.
Renaming and deleting a variable
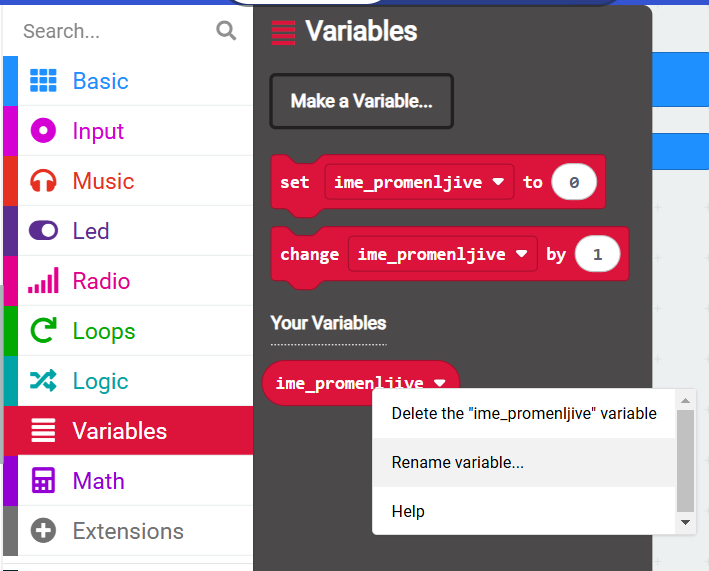
To rename or delete a variable, right-click on the variable to show the "context menu", as you can see in Figure 2:
Example 1: Click counter
Description:
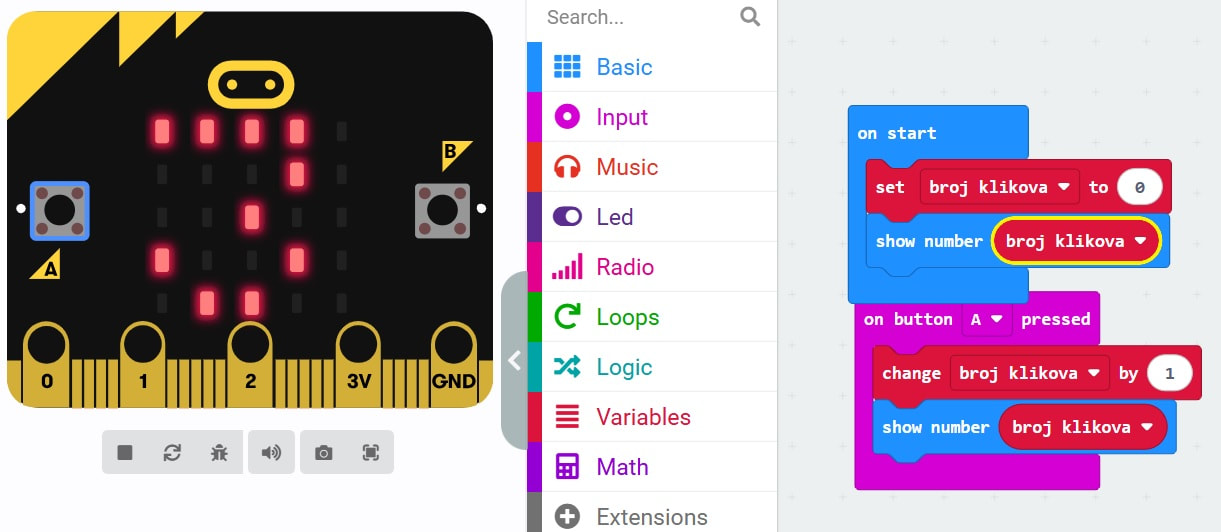
The project "Click counter" is a simple way to understand how variables work in programming. This example lets users create a program that tracks the number of presses of button A on the Micro:bit. Every press increases the value of the variable and shows the current number of clicks on the LED screen in real time. This is a useful tool for tracking repeated events on the device.
Instructions for creating the program "Click counter"
- Initializing the variable
- Open the MakeCode editor (https://makecode.microbit.org/).
- In the Variables palette, create a variable called NumberOfClicks.
- Set the starting value of the variable to 0 using the block set NumberOfClicks to 0 inside the block on start.
- Increasing the number of clicks
- From the Input palette, drag the block on button A pressed.
- Inside this block:
- Add the block change NumberOfClicks by 1 to increase the value of the variable with every button press.
- Add the block show number NumberOfClicks from the Basic palette to show the current value on the Micro:bit screen.
- Testing the program
- Download the program you made by clicking Download and transfer it to the Micro:bit device.
- Press button A and watch how the device shows the total number of clicks.
Result
Every press of button A increases the number in the variable NumberOfClicks by one and shows it on the LED screen of the Micro:bit. This way you can easily count events or actions, which makes this example useful and practical for everyday use.
The same program in JavaScript (MakeCode):
let number_of_clicks = 0
basic.showNumber(number_of_clicks)

input.onButtonPressed(Button.A, function () {
    number_of_clicks += 1
    basic.showNumber(number_of_clicks)
})
The Math palette
In this lesson we will explore how to use variables in programming to perform mathematical operations. Through a practical example, you will create code that multiplies two numbers, which is a great way to check and apply your knowledge of the multiplication table. Besides multiplication, depending on the time available, the activities can be extended to other arithmetic operations, such as addition, subtraction and division. At the end of the lesson there will be a chance to share your work with others, comment on it and get useful suggestions for improvement.
Arithmetic operations: +,-,*,/
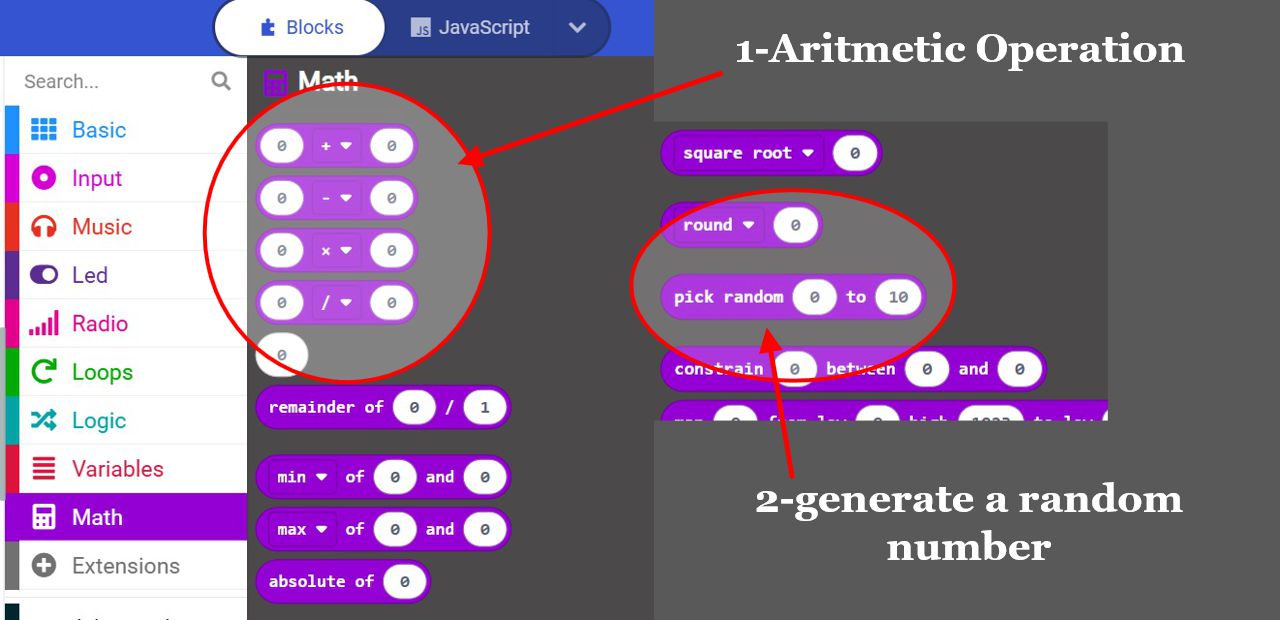
To perform the mathematical operation addition, subtraction, multiplication or division, open the Math palette and choose one of the commands from command group 1, see Figure 4.
Generating a random number from 0-10
To generate a random number from 0 to 10, choose the command pick random [0] [10] from the Math palette, marked with number two in Figure 4. If you want a value in a different range, instead of 0 and 10 put the minimum and maximum values between which the random number should be.
Example 2: A game with numbers – Showing numbers and their products on the Micro:bit
Task: Create a program on the Micro:bit that reacts to button clicks. The program should show the following:
- When you press button A, the first number is shown on the screen.
- When you press button B, the second number is shown on the screen.
- When you press buttons A and B at the same time, the product of these numbers is shown on the screen.
This task is a great way to practise basic handling of numbers and interaction with the buttons on the Micro:bit device. By programming this example, you can better understand how numbers are used in real applications, such as showing and computing values in applications with interfaces.
Instructions for the task "A game with numbers – Showing numbers and their products on the Micro:bit"
- Preparation:
- First, you need to define two numbers on the Micro:bit. These are the numbers you will show on the screen when you press buttons A and B.
- The numbers will be shown on the screen when the corresponding button is pressed, and the product of the two numbers when you press both buttons at the same time.
- Creating the program:
- Start by initializing the numbers. For example, let the first number be 5 and the second number 3. You can change these numbers later as you like.
- Add the blocks for buttons A and B. When button A is pressed, the value of the first number should be shown on the screen.
- When button B is pressed, the value of the second number should be shown.
- To show the product of the two numbers, use the block that detects when both buttons A and B are pressed at the same time. When this happens, the product of the numbers should be shown on the screen.
- Testing the program:
- When you finish the code, test it by pressing button A, B, and both together. Make sure that the screen shows exactly:
- The first number when you press A.
- The second number when you press B.
- The product of both numbers when you press A and B at the same time.
- When you finish the code, test it by pressing button A, B, and both together. Make sure that the screen shows exactly:
- Additional options:
- You can add more operations (addition, subtraction) and extend this task. You can also use different numbers and experiment with the Micro:bit screen.
This task helps you understand how numbers are used in programming and how buttons are connected to actions on the device, as well as practise basic operations with numbers.
Task for independent work 1: Product of random numbers
Generate two integers, a and b, whose values are random numbers 0-10. Compute the product of these numbers when buttons A+B are pressed and show it on the micro:bit.
Task for independent work 2: Quizzing the multiplication table
Create a program for two Micro:bit devices that communicate over a radio connection. The first Micro:bit ("sender") sends an integer a, while the second Micro:bit ("receiver") receives this value, generates a random number b, and computes the product of these two numbers. When button A+B is pressed, the result of the multiplication is shown on the screen of the second Micro:bit and sent back to the first Micro:bit, which shows the received result on its screen.
Explanation: This task demonstrates how Micro:bit devices can communicate with each other using the radio functionality. The key elements include:
- Sending and receiving messages over a radio connection.
- Generating a random number using the built-in functions of the Micro:bit.
- Synchronizing the activities of both devices.
The task helps you understand the basic principles of radio communication and handling data on the Micro:bit platform.
Instructions
Setting up the radio connection:
- On both Micro:bits you need to set the same radio group using the command radio.setGroup(). This allows the devices to communicate within the same network.
2. Programming the sender:
- Set the variable a for the number that will be sent.
- On a certain event (e.g. pressing button A) send the value of the variable a using radio.sendNumber(a).
- When the result is received from the other Micro:bit, show the value on the screen.
3. Programming the receiver:
- Receive the number a from the sender using radio.onReceivedNumber.
- Generate a random number b using randint(min, max).
- Compute the product a * b and show the result when button A+B is pressed.
- Send the result back to the sender using radio.sendNumber().
4. Testing and adjusting:
- Check that the communication works correctly by paying attention to the accuracy of the results and whether both devices show and send the data correctly.
Additional tasks
Enter the values of the variables a and b using some events on the micro:bit (button presses, gesture events), and then compute the following expressions and show them on the micro:bit screen:
- a) a2
- b) a2 + 2ab + b2
The Math command palette
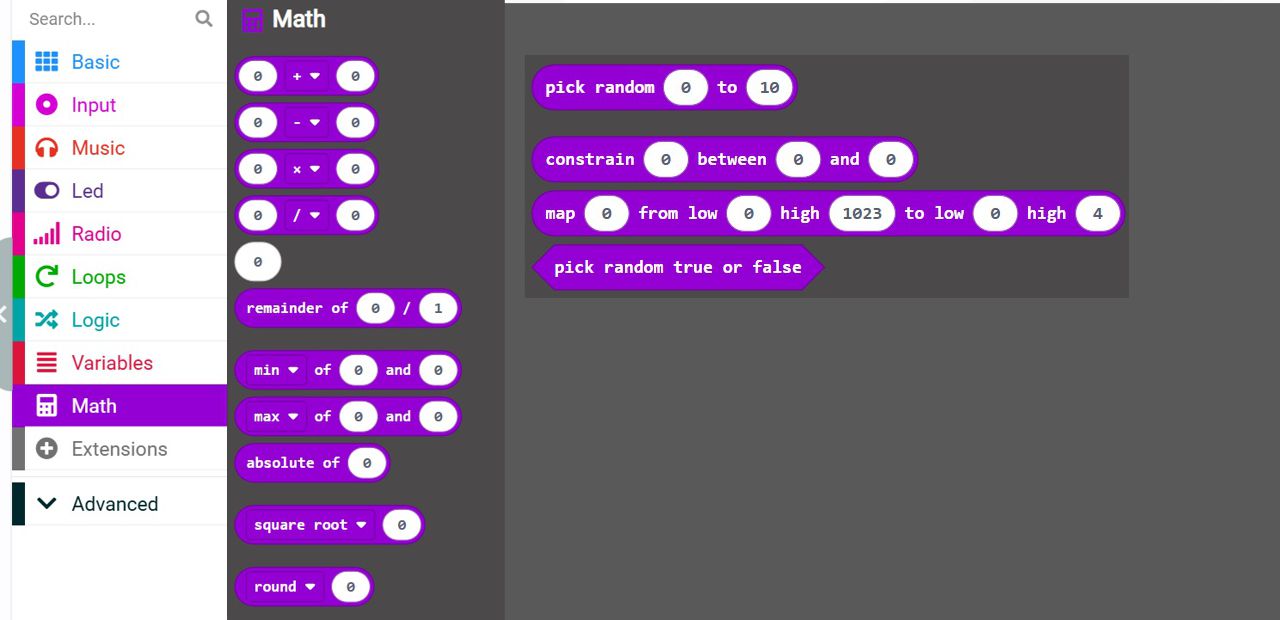
Below is an overview of the commands in the Math palette, with descriptions: Arithmetic Operators
- Addition (+)
Adds two values.
Example: 3 + 4 returns 7. - Subtraction (-)
Subtracts the second value from the first.
Example: 7 - 4 returns 3. - Multiplication (*)
Multiplies two values.
Example: 3 * 4 returns 12. - Division (/)
Divides the first value by the second.
Example: 8 / 2 returns 4.
Remainder
- % (Modulus)
Returns the remainder when the first value is divided by the second.
Example: 7 % 3 returns 1.
Random
- pick random 0 to 10
Generates a random number between the two given numbers (including both).
Example: pick random 1 to 6 can return any number between 1 and 6.
Comparisons
- = (Equal To)
Checks whether two values are equal.
Example: 4 = 4 returns true. - < (Less Than)
Checks whether the first value is less than the second.
Example: 3 < 5 returns true. - > (Greater Than)
Checks whether the first value is greater than the second.
Example: 5 > 3 returns true.
Advanced Math Functions
- square root (√)
Returns the square root of a value.
Example: √16 returns 4. - absolute value (|x|)
Returns the absolute value of a number.
Example: |-3| returns 3. - round
Rounds a number to the nearest integer.
Example: round(3.6) returns 4. - ceil
Rounds a number up to the nearest larger integer.
Example: ceil(3.2) returns 4. - floor
Rounds a number down to the nearest smaller integer.
Example: floor(3.8) returns 3.
Trigonometric Functions
- sin(x), cos(x), tan(x)
Compute the sine, cosine and tangent of an angle (in degrees).
Example: sin(90) returns 1. - asin(x), acos(x), atan(x)
Return the corresponding angles (in degrees) for a given value.
Example: asin(1) returns 90.
Exponential Functions
- power (x^y)
Returns the result of raising a number to a power.
Example: 2^3 returns 8. - log(x)
Returns the natural logarithm of a number.
Example: log(10) returns approximately 2.302. - e^x
Returns the value of the exponential function for the given number.
Example: e^2 returns approximately 7.389.
Additional examples for independent work
1. Radio connection with variables
- Description: A program in which two micro:bit devices communicate over a radio connection. One device sends the value of a variable, while the other receives it and uses it, e.g. to control the LED display.
- Example project:
- Device 1: Randomly generates a number (uses the Math palette for random) and sends it by radio signal.
- Device 2: Shows the received number on the LED display.
- Further development: Use Math functions to process the received values (e.g. computing the square of the number).
2. Combining input (Input) and variables
- Description: A program in which the value of a variable changes based on user input with buttons A and B.
- Example project:
- Button A increases the value of the variable.
- Button B decreases the value.
- On button A+B the micro:bit shows the current value on the screen.
- Further development: Add Math operations, e.g. showing the square of the current value.
3. Using Math commands to simulate a game
- Description: A program that uses the Math palette to create a game in which the micro:bit randomly generates a number and the user tries to guess the result.
- Example project:
- Randomly generating a number.
- The user enters a guess with the buttons.
- The LED screen shows whether the guess is correct or wrong.
4. Combining the Math and Music palettes
- Description: Creating a program that uses variables to control music.
- Example project:
- The variable note changes the pitch of the tone depending on the value of an input (e.g. the light sensor or temperature).
- Add functionality for changing the duration of notes using Math operations.
5. Advanced radio connection for transferring music
- Description: Two micro:bit devices – one chooses a random melody using Math functions, while the other plays the music after receiving a message over the radio connection.
Project 3: Generating random numbers and adding
Description: Create a program that generates two random numbers between 1 and 10, shows them on the Micro:bit screen, and then adds these numbers and shows the result.
Code in MakeCode:
- On button A: generate the first random number and show it.
- On button B: generate the second random number and show it.
- On A+B: add the two numbers and show the result.
Steps:
- Use Math → pick random to generate random numbers.
- Create variables, e.g. number1 and number2, to store the numbers.
- Use + from the Math palette for addition.
Solution in JavaScript
let number1 = 0
let number2 = 0
input.onButtonPressed(Button.A, function () {
    number1 = randint(1, 10)
    basic.showNumber(number1)
})
input.onButtonPressed(Button.B, function () {
    number2 = randint(1, 10)
    basic.showNumber(number2)
})
input.onButtonPressed(Button.AB, function () {
    let sum = number1 + number2
    basic.showNumber(sum)
})
Project 4: Computing the absolute difference between two numbers
Description: Create a program that takes two numbers, shows them, and computes the absolute difference between them.
Code in MakeCode:
- On button A: enter the first number.
- On button B: enter the second number.
- On A+B: compute the absolute difference between the numbers.
Steps:
- Use Math → abs for the absolute value of the difference.
- Store the values in the variables x and y.
Solution in JavaScript
let x = 0
let y = 0
input.onButtonPressed(Button.A, function () {
    x = 5 // Enter the number manually or adapt it to user input
    basic.showNumber(x)
})
input.onButtonPressed(Button.B, function () {
    y = 8 // Enter the number manually or adapt it to user input
    basic.showNumber(y)
})
input.onButtonPressed(Button.AB, function () {
    let difference = Math.abs(x - y)
    basic.showNumber(difference)
})
Project 5: Computing the square root of a product
Description: Create a program that takes two numbers, multiplies them, computes the square root of the product and shows the result.
Code in MakeCode:
- On button A: enter the first number.
- On button B: enter the second number.
- On A+B: compute the product and its square root.
Steps:
- Use Math → * for multiplication and Math → √ for the square root.
Solution in JavaScript
let a = 0
let b = 0
input.onButtonPressed(Button.A, function () {
    a = 9 // Adapt to user input
    basic.showNumber(a)
})
input.onButtonPressed(Button.B, function () {
    b = 4 // Adapt to user input
    basic.showNumber(b)
})
input.onButtonPressed(Button.AB, function () {
    let product = a * b
    let root = Math.sqrt(product)
    basic.showNumber(root)
})
Check your knowledge
Open the quiz
Variables and the Math palette
1. What does the block pick random 1 to 10 (randint(1, 10)) return?
2. Which event is used for pressing both buttons at the same time?
3. What does Math.abs(x - y) compute?
4. What is 17 % 5 (the remainder of the division)?