
Loops on the micro:bit: repeat, while, for and every ms
Loops are control structures that allow one or more statements to be repeated a certain number of times or until some condition is met. These structures are key for optimizing code and solving problems efficiently, especially in projects with microcontrollers such as the Micro:bit. In the MakeCode environment, loops are easily available in the Loops palette, where you can choose between different kinds of loops adapted to your needs.
In the previous part of the tutorial we used the statement "forever", which executes the statements inside it in an infinite loop; this is useful for creating programs that constantly listen to or react to changes in the environment. However, MakeCode also provides other loops, such as "repeat", which allow precise control of the number of repetitions, and "while", which repeat a block of statements while a certain condition is true.
In this lesson we will explore how you can use different loops to control light effects, count inputs, react to buttons and much more. Whether you are making a simple counter or a complex interactive device, understanding loops will let you create efficient and reliable code for your Micro:bit. Read also the article: Loops in the C/C++ programming language
Example 1: Counter
Task: Imagine that you want to count from 1 to 5 and show the number on the LED screen:
- Open the Loops palette and drag the while block onto the workspace.
- Add the condition number <= 5 to the "while" block using Math and Variables blocks.
- Define the variable number (Variables palette) and initialize it to 1.
- Inside the "while" block:
- Use the Basic → Show Number block to show the number.
- Add the block for increasing the variable number by 1 (Variables → Change by).
Solution (JavaScript in MakeCode):
let number = 1
while (number <= 5) {
    basic.showNumber(number)
    number += 1
}
Example 2: Counting down to zero
Task: Show on the micro:bit screen the numbers from some starting value down to zero.
- Create the variable number and set its starting value to 5.
- Add a while block with the condition number >= 0.
- Inside the "while" block:
- Use Basic → Show Number to show the current value.
- Decrease the value of the variable number by 1 using Change by (-1).
- After the "while" loop, use the Basic → Show String block to show the text "End!".
Example 3: Stopping based on a sensor
Task: Make the heart icon be shown on the micro:bit until button A is pressed.
- Add a while block with the condition not button A is pressed (palettes Logic → NOT and Input → Button A pressed).
- Inside the "while" block use Basic → Show Icon and choose the heart icon.
- After leaving the loop, use the Basic → Show String block to show "Start!".
Example 4: Finding the divisors of a random number
- When you press button B, the micro:bit randomly generates a number between 1 and 50.
- The number is shown on the screen, and then the micro:bit shows all its divisors one by one.
Explanation
The while loop is used to iterate through all possible divisors of the number. It checks whether the current number divides the given number without a remainder. If the condition is met, the divisor is shown on the screen, and then the number being checked is increased. The loop ends when all numbers up to the given number have been checked.
Instructions for dragging blocks in MakeCode
- Open the MakeCode editor: Visit MakeCode for micro:bit.
- Choose a category: Click the Loops category in the palette on the left.
- Dragging a block: Click and drag the while do block onto the workspace in the middle.
- Adding a condition: Click the Logic category and drag a condition (e.g. 0 < 0) into the condition slot of the while do block.
- Adding commands: Add blocks from other categories inside the loop.
Code in MakeCode
let number = 0
let i = 0
input.onButtonPressed(Button.B, function () {
    number = randint(1, 50)
    basic.showNumber(number)
    i = 1
    while (i <= number) {
        if (number % i == 0) {
            basic.showNumber(i)
        }
        i += 1
    }
})
Code explanation
- randint(1, 50): Generates a random number between 1 and 50.
- Initializing i: Sets the variable for the divisors to 1.
- while (i <= number): The loop runs while i is less than or equal to the generated number.
- Checking the condition (if (number % i == 0)): Checks whether the current number is a divisor.
- Showing it on the screen (basic.showNumber(i)): If the condition is met, the divisor is shown.
- i += 1: The number being checked is increased.
The Loops palette
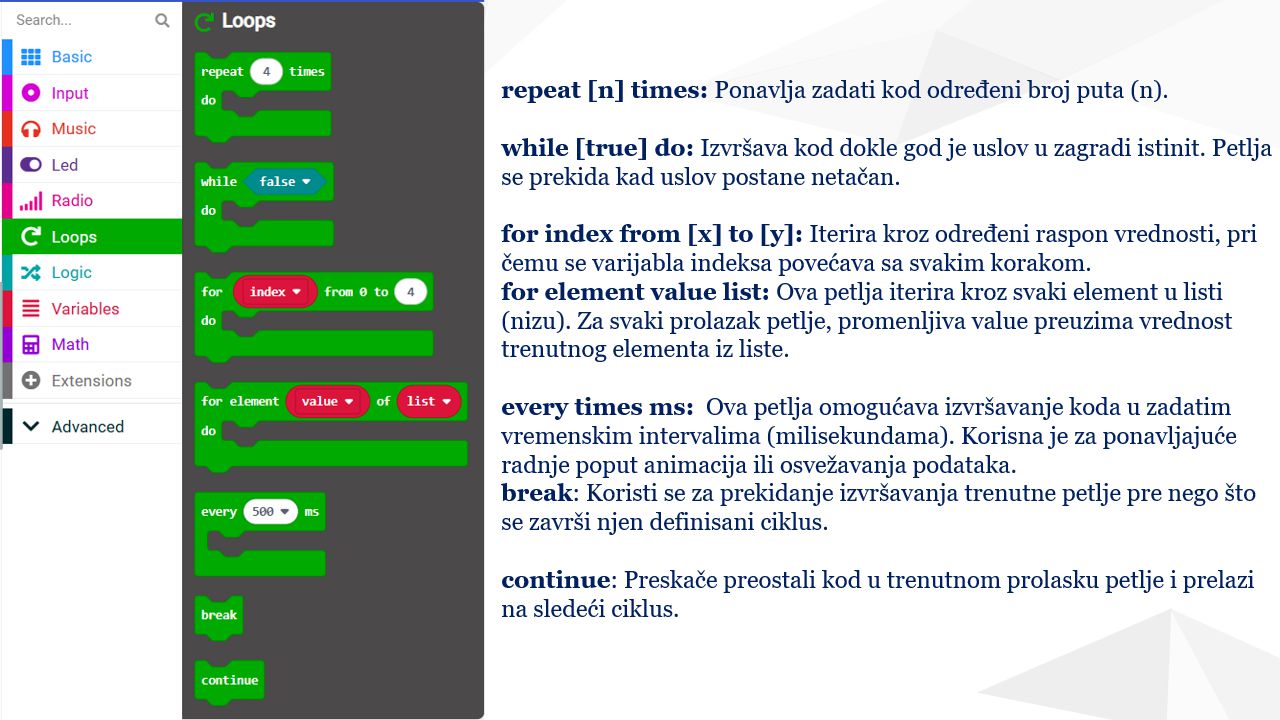
Description of the commands
- forever: Executes the code inside the block an infinite number of times, as long as the micro:bit is on.
- repeat [n] times: Repeats the given code a certain number of times (n).
- while [true] do: Executes the code as long as the condition in the brackets is true. The loop stops when the condition becomes false.
- for index from [x] to [y]: Iterates through a certain range of values, with the index variable increasing with every step.
- for element value list: This loop iterates through every element of a list (array). In every pass of the loop, the variable value takes the value of the current element of the list. It is suitable for working with arrays when you want to perform an action for every element, such as adding up the elements, printing them, or other operations.
- every times ms: This loop allows code to be executed at given time intervals (milliseconds). It is useful for repeated actions such as animations or refreshing data. The ms value determines how often the blocks inside the loop are repeated.
- break: Used to stop the execution of the current loop before its defined cycle is finished. It exits directly from the loop. It is often used with conditions inside the loop, for example to stop the loop when a certain element is found.
- continue: Skips the rest of the code in the current pass of the loop and moves on to the next cycle. It is useful when you want to skip certain iterations. It is mostly used with if conditions to skip certain values.
Example 5: Show all even natural numbers up to a given value
Create a program for the micro:bit that:
- When started, generates a random number in the range from 0 to 50.
- On the shake event shows all even numbers up to the value of that random number.
- (Optional: version B) Adds the functionality to generate a new random number by pressing button A.
Instructions
Basic version of the task:
- Defining the random number:
- Use the block set variable to pick random in the Variables section and set a random number in the range from 0 to 50. Add this inside the block on start.
- Detecting shaking:
- In the Input section choose the block on shake.
- Add the loop for index from 0 to randomNumber, where randomNumber is the previously defined variable.
- Inside the loop check whether the number is even with a condition (e.g. if index % 2 = 0). If you use blocks, the remainder of a division is computed with the block <remainder of index/2 > from the Math palette. You need to check whether the remainder of dividing index by 2 is equal to 0.
- If the number is even, use show number to show it on the screen.
Version B of the task (optional):
- Adding functionality for button A:
- Use the block on button A pressed from the Input section.
- Inside the block define the random number again using set variable to pick random.
Code in MakeCode (text description):
- On on start:
- Set the variable randomNumber to a random number in the range from 0 to 50.
- On on shake:
- Go through all numbers from 0 to randomNumber using a loop.
- Check whether the number is even (number % 2 == 0).
- If it is, show it on the screen.
- (Optional) On button A pressed:
- Set randomNumber to a random number again.
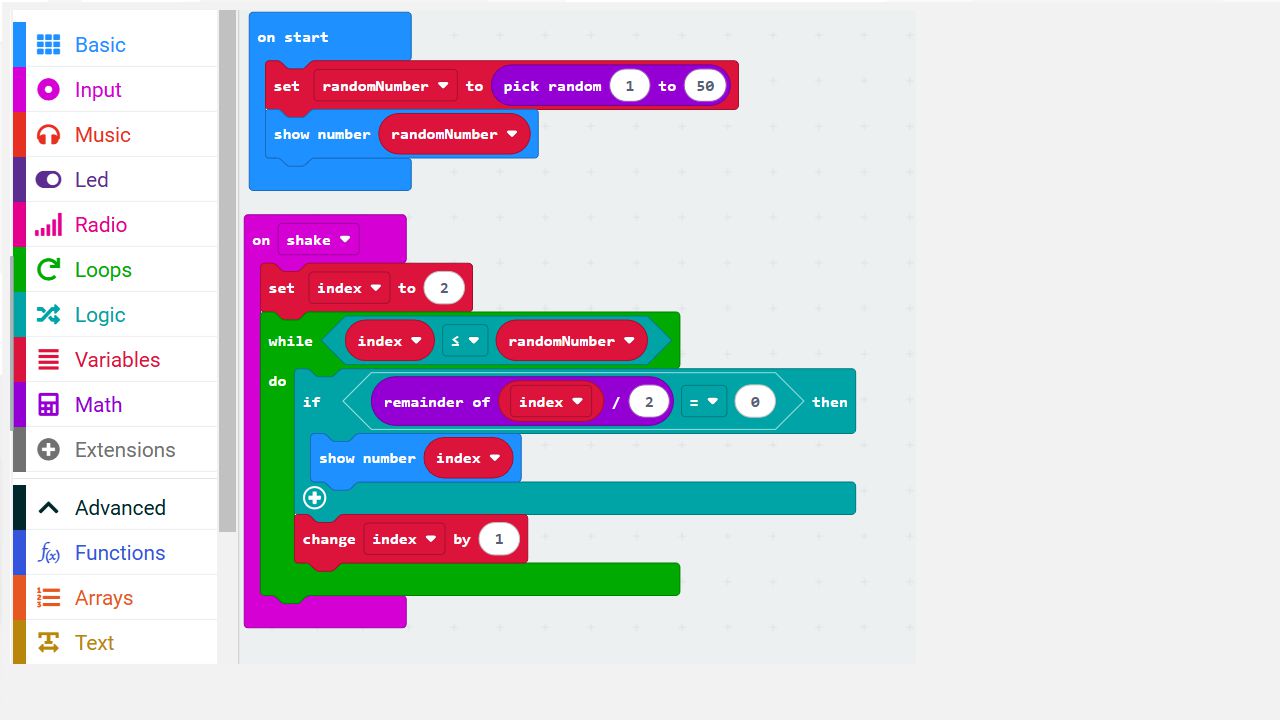
The same program in JavaScript (MakeCode):
let index = 0
let randomNumber = randint(1, 50)
basic.showNumber(randomNumber)

input.onGesture(Gesture.Shake, function () {
    index = 2
    while (index <= randomNumber) {
        if (index % 2 == 0) {        // the remainder of division by 2 is 0 – the number is even
            basic.showNumber(index)
        }
        index += 1
    }
})
Tasks for independent work
1. Turning LEDs on (basic level)
Task: Use forever to turn all LEDs on the micro:bit on and off at an interval of 1 second.
Instructions:
- Click the Loops palette and drag the block forever onto the workspace.
- Drag show leds from the Basic palette into it and turn on all LEDs.
- Add pause (1000 ms) from Basic, and then clear screen with another pause.
2. Arrow block
Task: Use repeat [5] times to show an arrow that changes towards each side of the screen (up, down, left, right).
Instructions:
- Add the basic loop:
- From the Loops palette drag the block repeat [4] times onto the workspace.
- Set the number of repetitions to 4 (or more, if you like).
- Set up showing the arrow:
- From the Basic palette drag the block show icon inside the loop.
- In the first repetition choose the arrow pointing up (arrow north).
- Change the arrow in every iteration:
- Add if then blocks from the Logic palette inside the loop to check the current state of the iteration counter.
- For example:
- If the iteration is 1: set the arrow up.
- If the iteration is 2: set the arrow right (arrow east).
- If the iteration is 3: set the arrow down (arrow south).
- If the iteration is 4: set the arrow left (arrow west).
- Make it clearer with pauses:
- From the Basic palette add the block pause (ms) after every arrow (e.g. 500 ms), so that users have enough time to see the change.
Useful tips:
- Use an additional loop or a counter to increase the iterations automatically.
- Experiment with show LEDs blocks to draw custom shapes instead of predefined icons.
3. A blinking dot on the screen
Task: Draw a dot in the middle of the screen using while [true] do, so that it blinks every 500 ms.
Instructions:
- Drag while from Loops.
- Set the condition to true.
- Inside, add show leds with the central dot and pause statements.
4. Counting from 0 to 9
Task: Use for index from 0 to 9 to show the numbers from 0 to 9 on the micro:bit screen.
Instructions:
- Use for index from 0 to 9 from Loops.
- Add show number inside the loop and connect the number to index.
5. Animation of a moving pixel
Task: Draw a pixel that moves horizontally across the screen and returns to the start using for and pause statements.
Instructions:
- Use for index from 0 to 4.
- Inside the loop use plot to turn on the pixel and pause, and then unplot.
6. Radio message
Task: Use repeat to send the message "Hello!" 10 times over the radio.
Instructions:
- Use the repeat block and add radio send string with the message.
- Include a pause after every message.
7. Responsive LED display
Task: Use while [true] do to show "A" when button A is pressed, and "B" when button B is pressed.
Instructions:
- Use a while loop and set the condition for button A or B.
- Add the corresponding show string commands for each case.
8. Turning LEDs on in a pattern
Task: Use for to turn the LEDs on the screen on and off so that they form a diagonal pattern.
Instructions:
- Make a for loop for the pixel positions.
- Use plot for the diagonal pixels inside the loop.
9. Feedback with buttons
Task: Let the micro:bit show a counter that increases every time button A is pressed and resets when button B is pressed, using while.
Instructions:
- Use on button A pressed and change variable to increase the counter.
- Add a reset with on button B pressed.
10. Radio communication and a light signal
Task: Use while [true] do so that the micro:bit receives a message over the radio and, based on it, turns certain LEDs on (e.g. the message "on" turns all LEDs on, and "off" turns them off).
Instructions:
- Use while to constantly check radio received string.
- Add a condition for showing the LEDs based on the received message.
11. Controlling LED light with break
Task: Make a program that stops the loop when the number of pixels on the LED screen reaches 3.
Instructions:
- Use a while loop with a pixel counter.
- Increase the counter at every step.
- Use plot to turn on a pixel and break to exit when the counter reaches 3.
12. Skipping odd numbers with continue
Task: Use a loop to show only the even numbers from 1 to 10. Skip the odd numbers using continue.
Instructions:
- Use for index from 1 to 10.
- Inside the loop check whether the number is odd (index % 2 != 0).
- If it is, use continue to skip the iteration.
- Show the remaining numbers using show number.
13. Working with lists using for element value in list
Task: Show the names of colours (e.g. red, blue, green) from a list one by one on the screen.
Instructions:
- Define a list of colours using set variable to list.
- Use for element value in list to iterate through the list.
- Show every colour using show string.
Detailed instructions:
- Define the list:
- Go to the Variables palette and click Make a Variable. Create the variable colors.
- Add the block set [colors] to [ ] from the Arrays palette.
- Click the list icon in the block and add the elements: "red", "blue", "green".
- Iterate through the list:
- From the Loops palette add the block for element value in list to the workspace.
- Put the list variable colors in the corresponding place in the loop.
- Showing the elements:
- From the Basic palette add the block show string inside the loop.
- Instead of static text, use value as the text to show.
14. Counting down with every [time] ms
Task: Make a countdown that decreases the number on the screen every 2 seconds until it reaches 0.
Instructions:
- Use every [2000] ms for the time interval.
- Define the variable counter and decrease it by 1 inside the block.
- Show the value of the counter using show number.
- Stop the countdown when the counter reaches 0.
15. Animation controlled by a list
Task: Use a list of pixel coordinates (e.g. [(0,0), (1,1), (2,2)]) and light them up in order using for element value in list.
Instructions:
- Define a list with the coordinates as an array of pairs.
- Use for element value in list to go through the list.
- Show the pixels using plot with the corresponding coordinates from the list.
- Add a pause between showing the pixels.
Finding the GCD with Euclid's algorithm
Euclid's algorithm
Euclid's algorithm is one of the oldest known mathematical algorithms. This algorithm is used to efficiently find the greatest common divisor (GCD) of two or more integers.
Read more about Euclid's algorithm in C and C++ in the article: Euclid's algorithm
Finding the greatest common divisor (GCD)
What is Euclid's algorithm? Euclid's algorithm is one of the oldest and most efficient methods for finding the greatest common divisor (GCD) of two integers. It was developed by the ancient Greek mathematician Euclid, and the algorithm is still used today in various fields of mathematics and computer science because of its simplicity and efficiency.
The basic principle of the algorithm. The main idea of Euclid's algorithm is based on the following facts:
- The GCD divides both numbers: If A and B are two integers, then their GCD divides both numbers.
- The remainder is also divisible by the GCD: The remainder when dividing A by B (marked as q) is also divisible by the GCD.
This means that, if we are looking for the GCD of the numbers A and B, we can use the following relation:
A = p⋅B + q, where p and q are integers, and q is the remainder when dividing A by B.
How does Euclid's algorithm work? The algorithm uses repeated division:
- We divide the larger number A by the smaller number B, which gives the quotient p and the remainder q.
- Swap the numbers: the new A becomes the old B, and the new B becomes q.
- Repeat the process while q≠0. When the remainder becomes 0, the remaining number B is exactly the GCD.
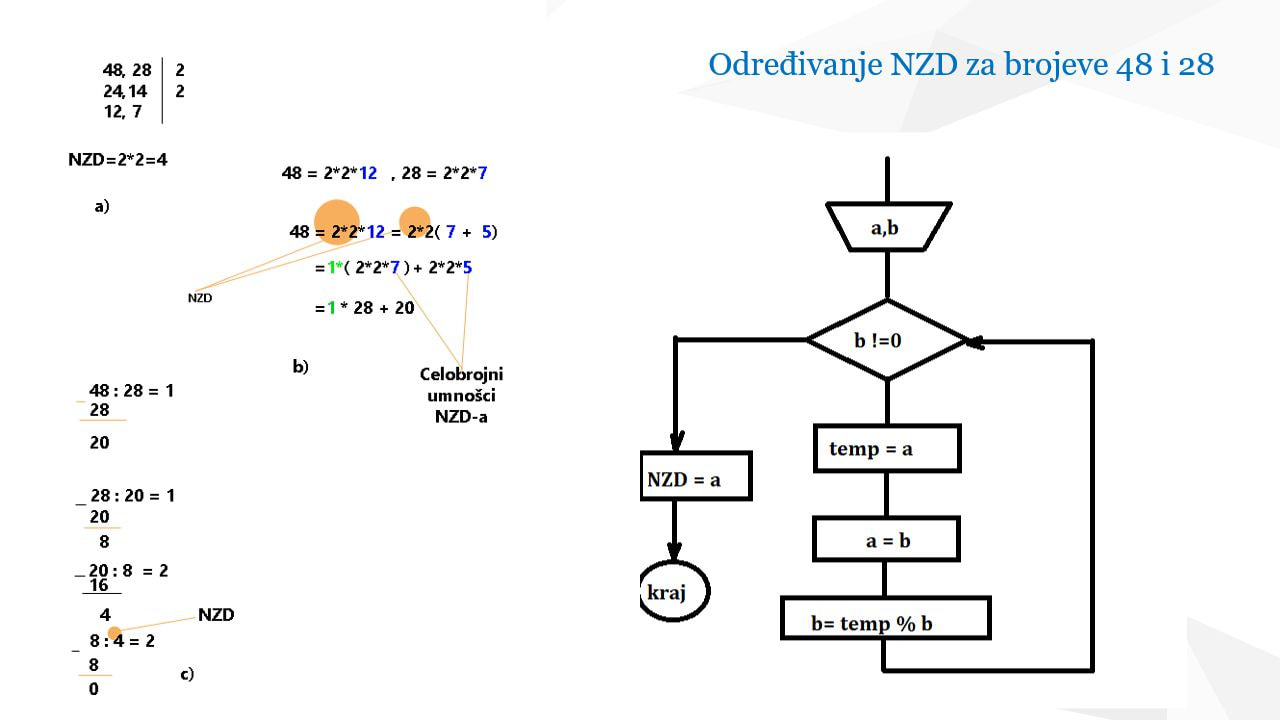
Picture a) shows the classic way of finding the GCD, which in this case is 4.
Picture b) shows that the GCD is contained in the numbers 48 and 28, but also in the remainder of dividing these two numbers. So we can say that:
48=1*28+20
which corresponds to expression 1:
A = p*B+q , p and q are integers
You can see in picture b) that B and q will be divisible by the GCD. If we now look for the GCD of B and q, i.e. of 28 and 20, we would see that the GCD is the same. By repeating the procedure of dividing the previous divisor by the remainder until in one iteration the remainder becomes zero, we reach the number that is the GCD. The last result of the division is actually the number we are looking for. In our example, it is the number 4. See picture c).
The procedure above is known as Euclid's algorithm.
Key conclusion
By repeating the division until the remainder becomes zero, we reach the GCD. In our example, the GCD of 48 and 28 is 4.
Euclid's algorithm is simple to implement and can easily be applied even on the micro:bit device, giving a practical understanding of this basic mathematical concept.
Example 3: Finding the GCD of the numbers a and b
Task description - Version A
On the micro:bit device, initialize two variables with the values 48 and 28. Using Euclid's algorithm, compute their greatest common divisor (GCD). When the device is shaken (on shake), show the GCD on the micro:bit screen.
Instructions for solving
- Setting the starting values:
- Find the on start block in the Basic palette.
- Define two variables, a and b, and set them to 48 and 28.
- Use the block show number to show the starting values.
- Applying Euclid's algorithm:
- Create the event on shake from the Input palette.
- Inside this event add a while loop that checks whether b != 0.
- Inside the loop:
- Store the value of a in the temporary variable temp.
- Set a = b.
- Compute the remainder temp % b and assign it to the variable b.
- After the loop, the value of a will be the GCD.
- Showing the GCD:
- Use the block show string to show "GCD=".
- Use the block show number to show the computed value of a.
Task description - Version B
Upgrade the task so that the values a and b are generated randomly in the range from 1 to 100. All other instructions stay the same.
Instructions for solving:
- Generating random values:
- Instead of fixed values in on start, use the block pick random to assign random numbers to the variables a and b.
- Show the initial values on the screen using show number.
- Computing and showing the GCD:
- The procedure for computing the GCD stays the same as in version A.
Example solution (using blocks)
- on start:
- a = 48
- b = 28
- Show a and b using show number.
- on shake:
- Loop while (b ≠ 0):
- temp = a
- a = b
- b = temp % b
- After the loop:
- show string "GCD="
- Show a.
- Loop while (b ≠ 0):
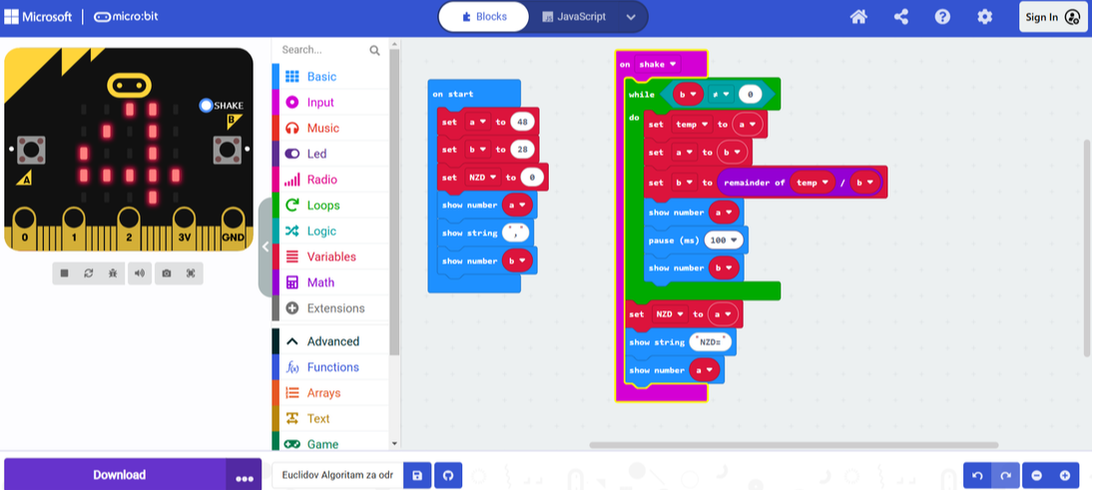
The same program in JavaScript (MakeCode):
let temp = 0
let GCD = 0
let a = 48
let b = 28
basic.showNumber(a)
basic.showString(",")
basic.showNumber(b)

// Euclid's algorithm: started by shaking
input.onGesture(Gesture.Shake, function () {
    while (b != 0) {
        temp = a
        a = b
        b = temp % b
        basic.showNumber(a)
        basic.pause(100)
        basic.showNumber(b)
    }
    GCD = a
    basic.showString("GCD=")
    basic.showNumber(a)
})
Solution in Python (MakeCode)
Program in Python (MakeCode):
def on_gesture_shake():
    global temp, a, b, GCD
    while b != 0:
        temp = a
        a = b
        b = temp % b
        basic.show_number(a)
        basic.pause(100)
        basic.show_number(b)
    GCD = a
    basic.show_string("GCD=")
    basic.show_number(a)
input.on_gesture(Gesture.SHAKE, on_gesture_shake)

temp = 0
GCD = 0
a = 48
b = 28
basic.show_number(a)
basic.show_string(",")
basic.show_number(b)
Check your knowledge
Open the quiz
Loops
1. How many times is the body of the loop repeat 4 times executed?
2. When does a while loop end?
3. What does break do in a loop?
4. What does this loop show: i = 1, while i <= 3 show i and increase i by 1?