
Games on the micro:bit: the Game palette and sprites
The micro:bit is a powerful but simple device that introduces users to the world of programming and electronics through fun and educational projects. One of the most popular activities with the micro:bit is making games, because it lets users learn how programming works through practical examples. With its LED matrix, buttons and built-in sensors, the micro:bit offers many possibilities for creativity.
In this tutorial we will guide you through the basic steps of making games on the micro:bit device using Microsoft MakeCode, a powerful and intuitive platform that supports visual and text programming.
Why make games with the micro:bit?
Making games with the micro:bit helps develop skills such as:
- Logical thinking and problem solving,
- Understanding algorithms,
- Basic knowledge of programming and electronics.
With the micro:bit you can make games such as "Guess the number", "Snake", "Avoiding obstacles" and many others, using its basic features.
How to make a game with the micro:bit?
- Open the Microsoft MakeCode platform: Visit MakeCode for micro:bit and start a new project by clicking New Project.
- Use the Games palette: In the MakeCode editor, find the Games palette, which contains specialized tools for making games. There you can create characters (sprites), make them move, detect collisions and manage points.
- Add interactive elements:
- Use the built-in buttons A and B to control the character.
- Create obstacles, targets or enemies using additional sprites.
- Add scoring or a timer to make the game more challenging.
- Test the game in the simulator: The simulator on the right lets you test the game before you transfer it to the micro:bit.
- Download the code and run it on the micro:bit: When you finish, download the program as a .hex file and load it onto your micro:bit with a USB cable.
What is the Games palette?
The Games palette is the key tool for making games in MakeCode. It allows:
- Creating sprites: The main characters and objects in the game.
- Moving sprites: Adding movement and reactions to button presses.
- Detecting collisions: Checking whether two sprites collide.
- Scoring: Adding and tracking points during the game.
- Managing outcomes: Allows setting conditions for the end of the game, showing the result and starting again.
An example of the functionality of the Game palette:
# The player is a sprite (a lit dot) in the bottom row of the screen
player = game.create_sprite(2, 4)

def on_button_pressed_a():
    player.change(LedSpriteProperty.X, -1)  # moving left
input.on_button_pressed(Button.A, on_button_pressed_a)

def on_button_pressed_b():
    player.change(LedSpriteProperty.X, 1)   # moving right
input.on_button_pressed(Button.B, on_button_pressed_b)
In Figure 1 you can see the commands in the Game palette
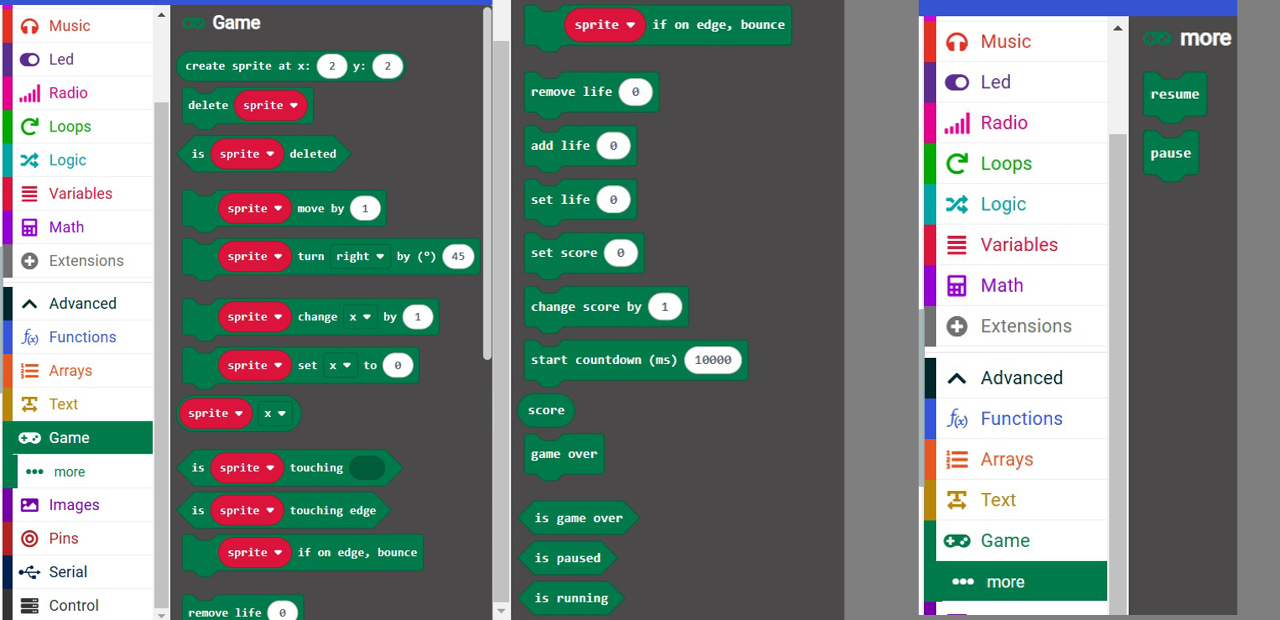
1. game.createSprite(x, y): Creates an LED sprite at the coordinates (x, y). This is your main object in the game.
2. sprite.move(steps): Moves the sprite a certain number of steps in the current direction.
3. sprite.turn(direction, degrees): Rotates the sprite in the given direction (Direction.Right or Direction.Left) by a certain number of degrees.
4. sprite.ifOnEdgeBounce(): When the sprite reaches the edge of the matrix, it automatically bounces back.
5. sprite.delete(): Deletes the sprite from the game.
6. game.addScore(points): Adds points to the current score of the game.
7. game.score(): Returns the current score of the game.
8. game.gameOver(): Ends the game and shows the "Game Over" message on the screen.
9. game.startCountdown(ms): Starts a countdown that lasts a certain number of milliseconds.
10. game.pause(): Pauses the game in its current state.
11. game.resume(): Continues the game after a pause.
12. game.setScore(score): Sets the current score of the game to a certain value.
13. game.isGameOver(): Checks whether the game is over and returns true or false.
14. sprite.isTouching(otherSprite): Checks whether the current sprite is touching another sprite. Returns true or false.
15. sprite.isDeleted(): Checks whether the sprite has been deleted. Returns true or false.
16. game.setLife(lives): Sets the number of lives to a starting value.
17. game.addLife(lives): Adds a certain number of lives to the current state of the game.
18. game.removeLife(lives): Removes a certain number of lives from the current state of the game.
19. game.life(): Returns the current number of remaining lives.
20. sprite.set(LedSpriteProperty.X, value): Sets the value of a certain property of the sprite (X, Y, Direction, Blink, or Brightness).
21. sprite.get(LedSpriteProperty.X): Returns the current value of a certain property of the sprite.
What can you make?
With the micro:bit and the Games palette, you can create various games such as:
- Snake: Moving a sprite that collects points.
- Avoiding obstacles: A character moves to avoid obstacles.
- Quizzes: Questions and answers using buttons A and B.
Examples of using the commands from the Game palette
Example 1: Creating a sprite and controlling it with buttons
Task text:
Make a game in which the main character (sprite) moves left or right using the buttons on the micro:bit device. The character is created at a starting position, and it is moved by pressing button A (left) or B (right).
Explanation:
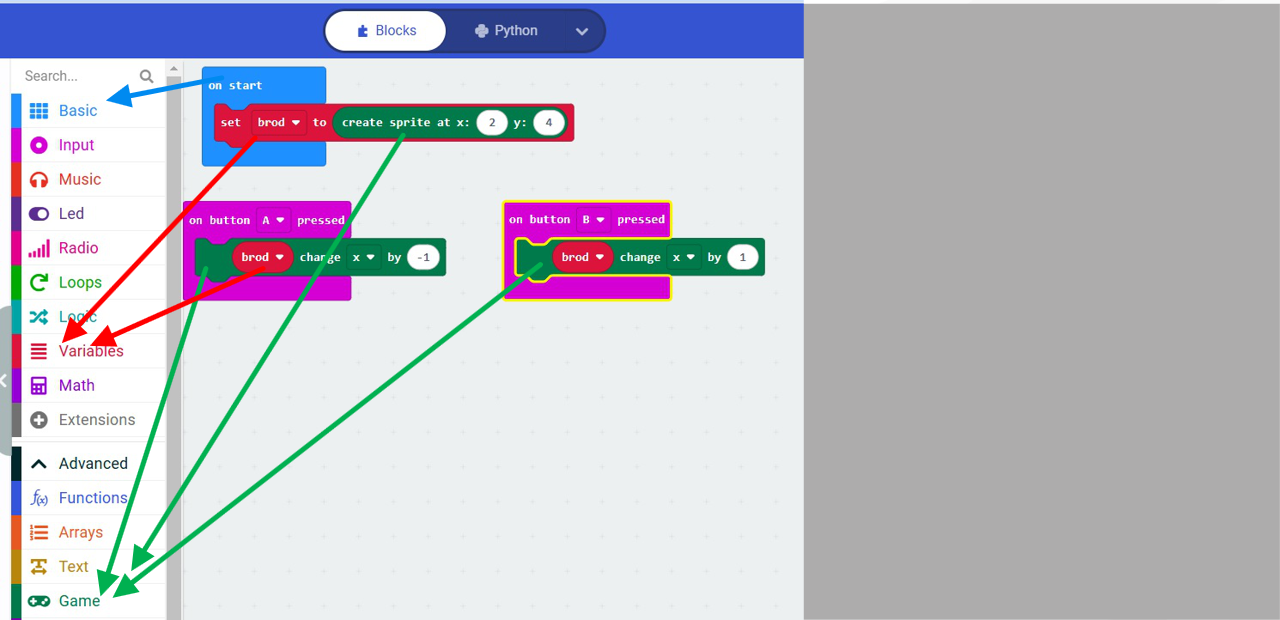
- A sprite (character) is created at the coordinates (2, 4).
- Button A moves the sprite to the left, while button B moves it to the right.
- This can be the basis for games such as "Catching objects".
Instructions for Scratch-like users
- Open MakeCode for micro:bit and switch to Blocks mode.
-
Drag the block
on startfrom the Basic section. -
Add the block
create sprite at x: 2 y: 4from the Game section to create the main character of the game.- Create a variable called
playerthat will represent your sprite. - Connect this variable with the block
create sprite. For example: "set player to create sprite at x: 2 y: 4". The sprite will be placed in the middle of the bottom row of the screen.
- Create a variable called
-
To control the sprite with the buttons:
- Drag the block
on button A pressedfrom the Input section. - Inside this block add the statement
change X by -1from the Game section to move the sprite to the left. - Repeat this step for button B, but inside the block
on button B presseduse the statementchange X by 1to allow moving the sprite to the right.
- Drag the block
- Your game is ready! Download the code to the micro:bit device and test how the sprite moves left and right when you press the buttons.
Code in Python (MakeCode)
# Defines the function that is called when button A is pressed
def on_button_pressed_a():
    # Moving the sprite (ship) to the left by decreasing the X coordinate by 1
    ship.change(LedSpriteProperty.X, -1)
# The function on_button_pressed_a is called when button A is pressed
input.on_button_pressed(Button.A, on_button_pressed_a)

# Defines the function that is called when button B is pressed
def on_button_pressed_b():
    # Moving the sprite (ship) to the right by increasing the X coordinate by 1
    ship.change(LedSpriteProperty.X, 1)
input.on_button_pressed(Button.B, on_button_pressed_b)

# The variable ship is of type game.LedSprite
ship: game.LedSprite = None
# Creating the sprite ship at position (2, 4)
ship = game.create_sprite(2, 4)
Using functions in MakeCode. Solving the example "Creating a sprite and controlling it with buttons" with functions
It is often useful to divide a complex task, which is usually solved with a larger number of statements, into smaller tasks, i.e. smaller program units – functions. This approach is especially useful when certain operations or tasks are repeated several times in a program.
Functions are defined only once, with a clear name that describes their purpose, and they can be called as many times as needed while the program runs. Such modularity not only makes the code easier to organize and read, but also makes it easier to maintain and extend the program.
For example, we could create functions for moving the ship left and right. The code for moving the ship left:
ship.change(LedSpriteProperty.X, -1)
could be put into a function called move_left(). Similarly, the code for moving the ship right:
ship.change(LedSpriteProperty.X, 1)
would be part of a function called move_right().
Functions defined this way not only make the code clearer, but also allow these operations to be called easily anywhere in the program, without writing the same statements again.
The Functions palette
To create the functions move_left and move_right, choose the Functions palette and click the "Make a Function" button (see Figure 3).
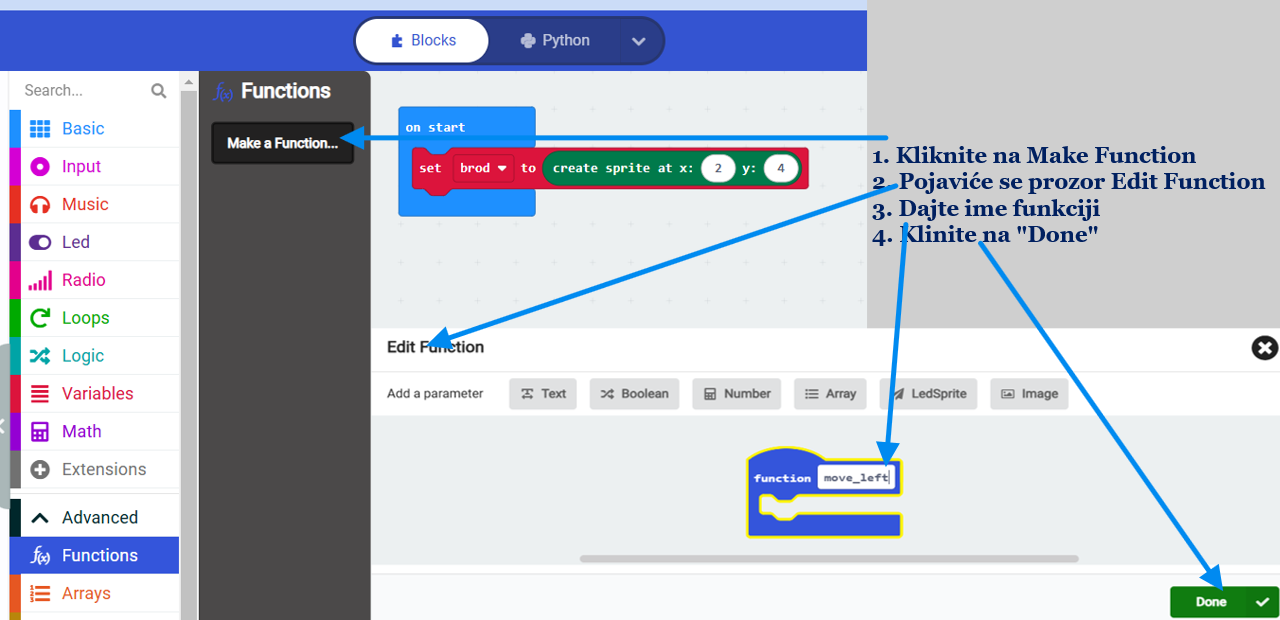
After that the "Edit Function" window opens, where you need to define the name of the function and then click the "Done" button (Figure 3).
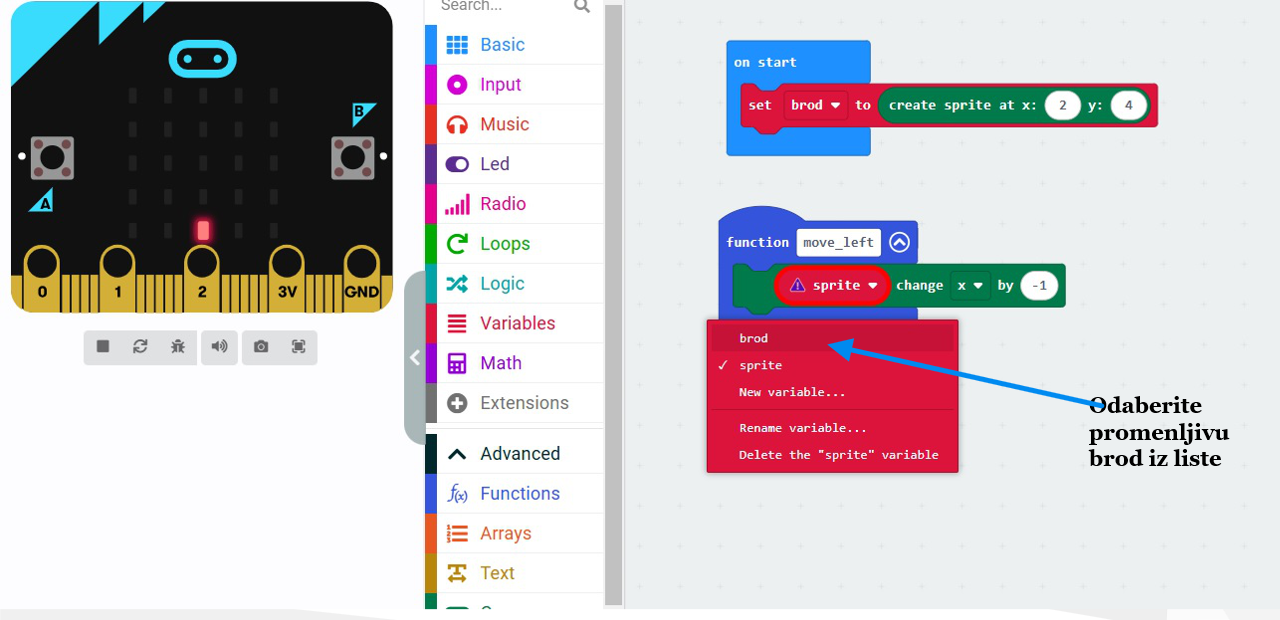
sprite change x by -1
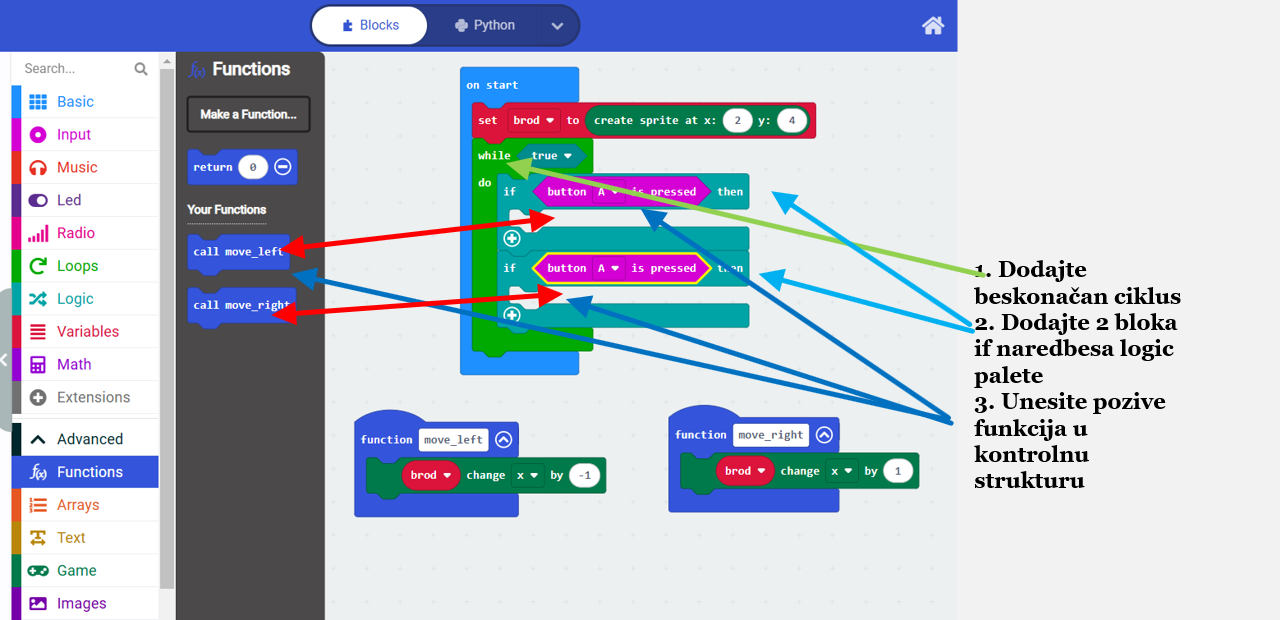
When the functions are created, the Functions palette gets the blocks for calling these functions, such as call move_left and call move_right (see Figure 5).
Choose the statement while true from the Loops palette and put it into the on start block. Then add two if statements and nest them inside the infinite loop.
With these statements you need to check whether button A or button B was pressed and call the corresponding function for moving left or right, as you can see in Figure 5.
Complete code in blocks
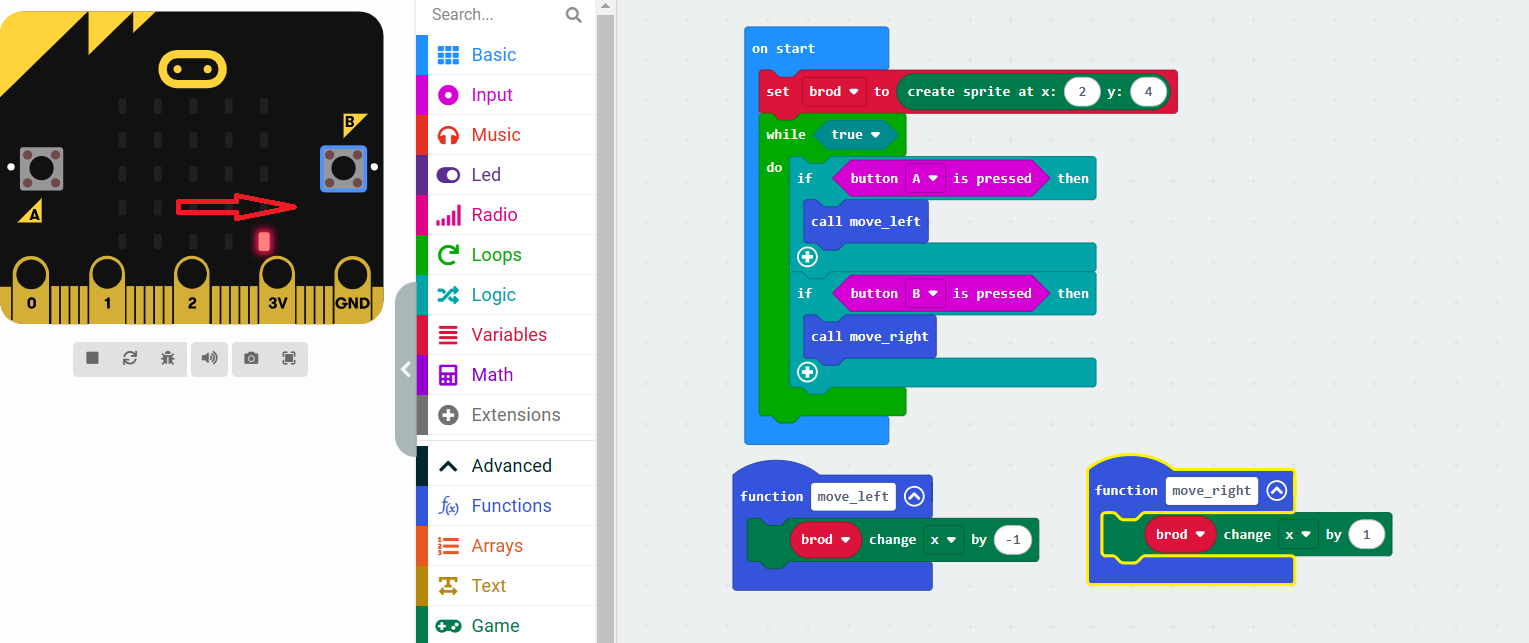
The following picture (Figure 7) shows the complete solution of the example in block mode:
Code in Python (MakeCode)
def move_right():
    ship.change(LedSpriteProperty.X, 1) # Moving the ship to the right

def move_left():
    ship.change(LedSpriteProperty.X, -1) # Moving the ship to the left

ship: game.LedSprite = None # Declaring the variable ship
ship = game.create_sprite(2, 4) # Creating the ship at the starting position

while True:
    if input.button_is_pressed(Button.A):
        move_left() # If button A is pressed, move the ship to the left

    if input.button_is_pressed(Button.B):
        move_right() # If button B is pressed, move the ship to the right
Example 2: Counting points
Task text: Make a game in which the player (sprite) has to hit a target and win a point. The target disappears after the player touches it. Add the functionality for counting the points automatically.
Steps for solving the task in a Scratch-like environment
- Adding sprites for the player and the target:
- Create a sprite for the player (e.g. a ball):
- Use the block
game.createSprite(x, y)from the Game palette. - Set the starting coordinates (e.g. x = 2, y = 2) so that the sprite starts from the centre of the 5x5 matrix.
- Create a sprite for the target (e.g. a star):
- Use the same block
game.createSprite(x, y), but enter different coordinates so that the target is in another place.
- Moving the player:
- Add the logic for moving the sprite with the buttons on the micro:bit:
- Use the block
on button pressedfrom the Input palette. - For each button press (A or B), call the methods
move(1)for moving forward orturn(Direction.Right, 90)for turning.
- Adding a random position for the target:
- Create a function for placing the target randomly:
- Use the block
set x to Math.random(0, 4)to generate random coordinates (x and y). - Make the target move to these coordinates using the block
targetSprite.moveTo(x, y).
- Checking the touch between the player and the target:
- Use the block
if sprite1.isTouching(sprite2)from the Logic palette: - If the player touches the target, add 1 point using the block
change score by 1. - Call the function for placing the target randomly so that it appears in another place.
- Use the block
- Showing the result:
- Show the current number of points on the screen using the block
basic.showNumber(score)from the Basic palette. - You can add this at the end of the game or after every successful touch.
- Show the current number of points on the screen using the block
- End of the game:
- Use the block
pause(ms)for a period of time (e.g. 30 seconds). - When the time runs out, show a final message using
basic.showString("Game over!"), and then show the total points.
- Use the block
Example of Scratch-like code (blocks)
- For the target:
- At the start of the game:
- Create the target at a random position using
game.create_sprite(randint(0, 4), randint(0, 4)).
- Create the target at a random position using
- When the ball touches the target:
- Increase the number of points by 1 using
game.add_score(1). - Move the target to a new random position by calling the function
moveTarget().
- Increase the number of points by 1 using
- At the start of the game:
- For the ball (player):
- At the start of the game:
- Put the ball at the starting position using
game.create_sprite(2, 2).
- Put the ball at the starting position using
- Moving the ball:
- When you press button
A, move the ball to the left by calling the functionmoveX("left"). - When you press button
B, move the ball to the right by calling the functionmoveX("right"). - When you tilt the device up or down, the ball moves vertically using the function
moveY().
- When you press button
- At the start of the game:
- For the game:
- At the start of the game:
- Set the number of points to 0 using
game.set_score(0).
- Set the number of points to 0 using
- End of the game:
- When the device is shaken (
Gesture.SHAKE), show the message"End!"and the total number of points won. - End the game by calling
game.game_over().
- When the device is shaken (
- At the start of the game:
Code in Python (MakeCode)
ball: game.LedSprite = None     # the ball controlled by the player
target: game.LedSprite = None   # the target to reach

def moveTarget():
    # the target moves to a new, random place
    target.set(LedSpriteProperty.X, randint(0, 4))
    target.set(LedSpriteProperty.Y, randint(0, 4))

def moveX(direction: str):
    if direction == "left":
        if ball.get(LedSpriteProperty.X) > 0:
            ball.change(LedSpriteProperty.X, -1)  # moves the ball to the left
    elif direction == "right":
        if ball.get(LedSpriteProperty.X) < 4:
            ball.change(LedSpriteProperty.X, 1)   # moves the ball to the right

def moveY(direction2: str):
    if direction2 == "up":
        if ball.get(LedSpriteProperty.Y) > 0:
            ball.change(LedSpriteProperty.Y, -1)  # moves the ball up
    elif direction2 == "down":
        if ball.get(LedSpriteProperty.Y) < 4:
            ball.change(LedSpriteProperty.Y, 1)   # moves the ball down

def on_gesture_logo_up():
    moveY("up")
input.on_gesture(Gesture.LOGO_UP, on_gesture_logo_up)

def on_gesture_logo_down():
    moveY("down")
input.on_gesture(Gesture.LOGO_DOWN, on_gesture_logo_down)

target = game.create_sprite(randint(0, 4), randint(0, 4))  # target at a random position
ball = game.create_sprite(2, 2)                            # ball in the middle
game.set_score(0)                                          # starting number of points

def on_forever():
    if input.button_is_pressed(Button.A):
        moveX("left")
        basic.pause(150)   # pause so that the ball does not fly to the edge
    if input.button_is_pressed(Button.B):
        moveX("right")
        basic.pause(150)
    if ball.is_touching(target):
        game.add_score(1)  # a point
        moveTarget()
    if input.is_gesture(Gesture.SHAKE):
        game.game_over()   # end of the game: shows GAME OVER and the number of points
basic.forever(on_forever)
Example 3: Countdown
Task text:
Create a game in which the player has limited time (10 seconds) to score as many points as possible. The character (sprite) moves across the screen automatically and bounces off the edges.
Explanation:
- A countdown of 10 seconds is set.
- The sprite moves automatically and bounces off the edge of the screen.
- When the time runs out, the game ends
Instructions for solving the task: Countdown
Steps for the solution
- Create a sprite for the player:
Add the command for creating a character that will move across the screen. For example, use
game.create_sprite(x, y)to place the sprite at the starting position. - Set the direction of movement of the sprite:
Define variables that will mark the direction of movement of the sprite along the X and Y axes. For example:
direction_x = 1anddirection_y = 1. - Move the sprite:
Use a loop that moves the sprite in the defined direction. In every iteration, check whether the sprite has touched the edge of the screen.
- Bouncing off the edges:
Add a condition for changing the direction when the sprite touches the edge. For example, if the X coordinate of the sprite is 0, change the direction to the opposite one.
- Time limit:
Use the function
game.start_countdown(ms)to limit the duration of the game to 10 seconds. - Counting points:
Add the possibility for the player to get points when the sprite touches certain points or meets specific conditions.
- End of the game:
When the time runs out, show the result using
game.game_over().
Explanation
This task involves working with loops, conditions and basic commands for handling sprites. The sprite moves in the given direction until it touches the edge, after which it changes direction. The player has limited time to score as many points as possible before the game ends.
Important commands from the palette
game.create_sprite(x, y): Creates a sprite at the given position.sprite.move(steps): Moves the sprite a certain number of steps.game.start_countdown(ms): Sets the time limit for the game.game.add_score(points): Adds points for a completed task.game.game_over(): Ends the game and shows the result.
Part of the code in Python (MakeCode)
game.start_countdown(10000)        # countdown of 10 seconds
player = game.create_sprite(2, 2)  # the player

def update_player():
    player.move(1)
    player.if_on_edge_bounce()     # the sprite bounces off the edge
    basic.pause(200)               # pause so that the movement is visible
basic.forever(update_player)
Detailed instructions for using Block mode in MakeCode
Follow these steps to implement the code using Block mode in the MakeCode editor:
1. Create a new project
Open the MakeCode editor and start a new project. When you open the editor, you see the start page with various options for blocks and JavaScript code. Switch to Blocks mode.
2. Add a sprite in the centre
To place a sprite in the centre of the screen, do the following:
- Open the Game palette on the left.
- Drag the block create sprite at (x, y) onto the workspace.
- Set the x and y coordinates to 2 (the centre of the screen).
3. Add a countdown
To add a countdown, follow these steps:
- Open the Game palette on the left.
- Drag the block start countdown(ms) onto the workspace.
- In this block set the value to 30000 (30 seconds).
4. Program the behaviour of the sprite
To let the sprite move and change direction when buttons A and B are pressed, do the following:
- Open the Game palette and drag the block move sprite by (x) onto the workspace.
- Set the number of steps to 1 (moves the sprite by one place).
- To let the sprite turn, open the Game palette and drag the block turn sprite by (x) degrees.
- Set the angle to 45 and choose the direction (left or right) for buttons A and B, using the Button A and Button B blocks from the Input palette.
5. Adding points for touching the edge
To add a point when the sprite touches the edge, do the following:
- Open the Game palette and drag the block if sprite is touching edge.
- Inside that block, drag change score by 1 from the Game palette.
6. Finish the game by showing the result
To end the game and show the current score, add the following:
- Open the Game palette and drag the block game over.
- Drag the block show string from the Basic palette to show the score on the screen.
7. Final look and running the game
After implementing all these steps, your game should work according to the given rules. Finally, click the Download button to download your project or test it in the simulator.
Complete solution in Python (MakeCode)
Example 4: Managing lives
Task text: Make a game in which the player starts with 5 lives. Every time they press button A, the number of lives increases by 1. The player loses one life every time the sprite touches the edge of the screen. When the number of lives reaches 0, the game ends automatically.
Explanation:
- The player starts with 5 lives at the beginning.
- Every press of button A increases the number of lives by 1.
- When the sprite touches the edge of the screen, one life is taken away.
- When the number of lives reaches 0, the game ends automatically and the message "Game Over" is shown.
Instructions for solving the task
In this task the goal is to create a game in which the player starts with 5 lives, and every time they press button A, the number of lives increases by 1. The player loses one life every time the sprite touches the edge of the screen. When the number of lives reaches 0, the game ends automatically.
- Initializing the lives: Use the command
game.set_life()from the Game palette to set the number of lives at the start of the game to 5. - Detecting a button press: Use a function that is triggered by pressing button A (
input.on_button_pressed()) and increases the number of lives by 1 withgame.add_life(). - Losing a life: When the sprite touches the edge of the screen, it loses one life with the command
game.remove_life(). - End of the game: When the number of lives reaches 0, the game ends automatically by calling the function
game.game_over(). - Testing: Run the program and check whether the game correctly recognizes the button presses and ends the game when the lives reach 0.
This is a simple game that uses basic functionality of the Game palette and lets players practise basic concepts such as variables and events.
Detailed instructions for using Block mode in MakeCode
Follow these steps to implement the code using Block mode in the MakeCode editor:
1. Create a new project
Open the MakeCode editor and start a new project. When you open the editor, you see the start page with various options for blocks and JavaScript code. Switch to Blocks mode.
2. Set the starting number of lives
To set the starting number of lives in the game, do the following:
- Open the Variables palette on the left.
- Drag the block set [variable] to [value] onto the workspace.
- Replace [variable] with lives, and [value] with 5 (the starting number of lives).
3. Create a sprite (character) in the centre of the screen
To place a sprite in the centre of the screen, follow these steps:
- Open the Game palette.
- Drag the block create sprite at (x, y) onto the workspace.
- Set the x and y coordinates to 2 (the centre of the screen).
4. Add a countdown
To add a countdown for the game, follow these steps:
- Open the Game palette.
- Drag the block start countdown(ms) onto the workspace.
- Set the value to 30000 (30 seconds).
5. Program the behaviour of the sprite
To let the sprite move and react to touching the edge of the screen, do the following:
- Open the Game palette and drag the block move sprite by (x) onto the workspace.
- Set the movement value to 1 (moves the sprite by one place).
- Open the Game palette and drag the block if sprite is touching edge.
- Inside that block, drag the block change score by 1 from the Game palette.
6. Taking a life away when the sprite touches the edge
To take one life away when the sprite touches the edge, follow these steps:
- Open the Game palette and drag the block remove life by (1).
- Add a block for showing the number of lives using basic show number.
7. Add an action for button A
To let users increase the number of lives by pressing button A, do the following:
- Open the Input palette and drag the block on button A pressed.
- Inside that block, drag the block change [lives] by (1) from the Variables palette.
- Add basic show number to show the number of lives on the screen.
8. Finish the game by showing the result
To end the game and show the current result, do the following:
- Open the Game palette and drag the block game over.
- Add the block basic show string from the Basic palette to show the result on the screen.
9. Final look and running the game
After implementing all these steps, your game should work according to the given rules. Finally, click the Download button to download your project or test it in the simulator.
Code in Python (MakeCode)
Example 5: Checking contact between sprites
Task text:
Make a game in which the player (sprite) gets a point every time it touches the enemy (another sprite). After the touch, the enemy disappears. Explanation:
- If the sprite "player" touches the sprite "enemy", 1 point is awarded and the enemy is removed.
- This can be used in games where objects are avoided or caught.
Steps for solving the task
- Create two sprites: One will represent the player and the other the enemy.
- Add a function for moving the player: Set up the movement of the sprite with buttons A and B.
- Check the contact: In the main loop check whether the player has touched the enemy.
- Update the points: If there is a contact, add a point and remove the enemy.
Explanation
This task uses the functionality for detecting contact between sprites and allows the game to be updated in real time. When the player touches the enemy, a point is added and the enemy is removed from the screen, simulating "catching".
Code in Python (MakeCode) – partial solution
player = game.create_sprite(2, 2)  # main sprite
enemy = game.create_sprite(4, 4)   # enemy

def check_collision():
    if player.is_touching(enemy):
        game.add_score(1)          # a point when the player touches the enemy
        enemy.delete()             # the enemy disappears
basic.forever(check_collision)
Detailed instructions for making the game in MakeCode (Block mode)
Follow these steps to implement the code using Block mode in the MakeCode editor.
1. Create a new project
Open the MakeCode editor and start a new project. When you open the editor, switch to Blocks mode.
2. Create the player (sprite)
Place the main character of the game (the player) in the centre of the screen.
- Open the Game palette.
- Drag the block set mySprite to create sprite at (x, y) onto the workspace.
- Set x = 2 and y = 2 (the centre of the screen).
3. Create the enemy
Generate the enemy at a random position.
- Drag the block set enemySprite to create sprite at (random 0 to 4, random 0 to 4).
4. Add a countdown
Set a timer of 30 seconds for the game.
- Open the Game palette.
- Drag the block start countdown (30000 ms) onto the workspace.
5. Moving the player
Set up the forward movement of the player and the reaction to the edges of the screen.
- Add the block forever from the Basic palette.
- Inside this block add move mySprite by (1).
- Add the block if on edge, bounce from the Game palette.
- Add a pause pause (500 ms) from the Basic palette.
6. Turning the player with the buttons
Let the player turn using buttons A and B.
- Open the Input palette and drag the block on button A pressed.
- Add the block turn mySprite right (45 degrees) from the Game palette.
- Repeat the same for button B, but set turn mySprite left (45 degrees).
7. Checking for collisions
Add a condition so that if the player touches the enemy, it gets a point and a new enemy is generated.
- Inside the forever loop add if mySprite is touching enemySprite.
- Inside this condition add the block delete enemySprite.
- Add change score by (1) from the Game palette.
- Pause the game with pause (300 ms).
- Create the enemy again with set enemySprite to create sprite at (random 0 to 4, random 0 to 4).
8. End of the game
If the countdown runs out, the game ends.
- Add the block if game is over from the Game palette.
- Inside it add the block game over.
9. Running the game
Test your game in the simulator or download the code to your Micro:bit device.
Previous
Check your knowledge
Open the quiz
Games and the Game palette
1. What is a sprite in the Game palette?
2. What does ship.change(LedSpriteProperty.X, -1) do?
3. What does if on edge, bounce do?
4. What does game.start_countdown(10000) do?