
Your first application in C#: Visual Studio and a console program
To create a simple console application in C# we need to install one of the available tools. This tutorial uses Visual Studio 2022 Community, which you can download from the following link: visualstudio.microsoft.com/downloads/
Installing Visual Studio Community 2022
Open the page from the link above and click the download link. The installer starts, as shown in the following picture:
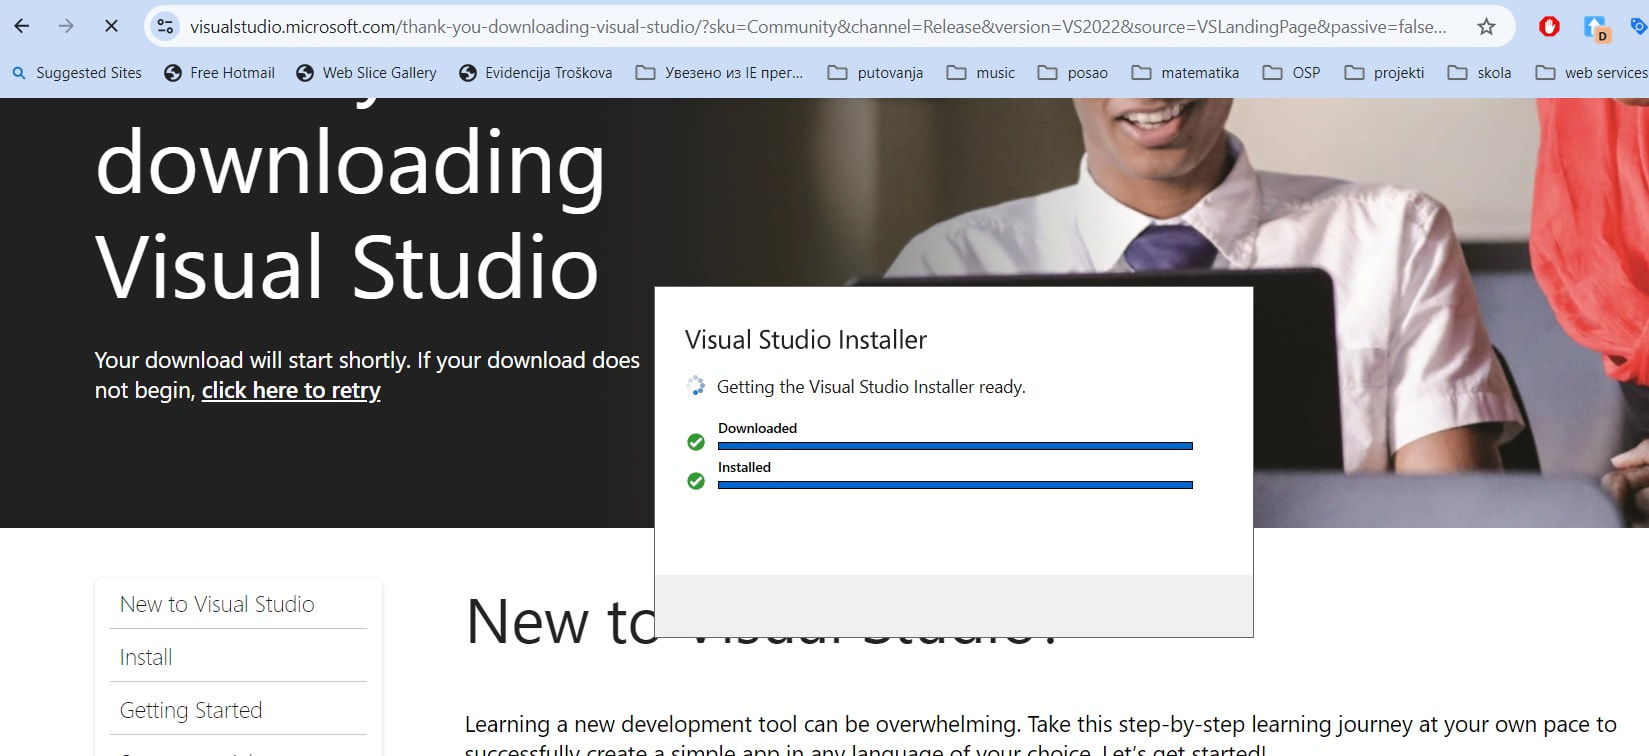
Then you finish the installation through a series of windows. First you choose which components you want to install.
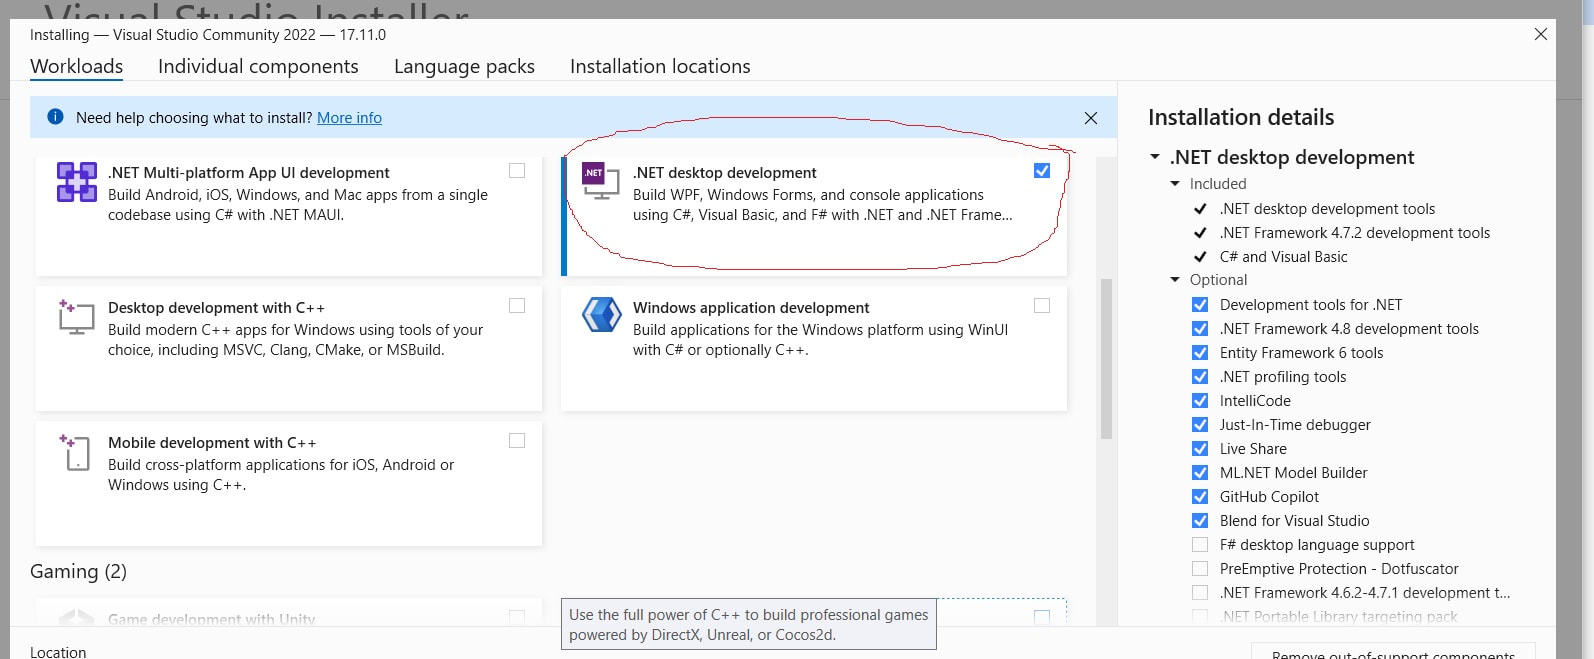
When you install Visual Studio Community Edition, you can choose different "workloads", which are predefined sets of tools and components used for certain types of projects. To create a C# application for the computer, it is recommended to choose the following options:1. .NET Desktop Development
- Description: This is the most important workload for developing C# applications for the computer. It lets you develop Windows applications with .NET technologies.
- Contains:
- Windows Forms applications (WinForms): The traditional way of creating desktop applications with a graphical interface.
- WPF (Windows Presentation Foundation): A more modern technology for building desktop applications with more advanced graphical capabilities.
- Console applications: Creating simple applications that use the command line.
2. ASP.NET and Web Development (optional)
- Description: If you also plan to do web development in C#, you can install this workload. It lets you develop web applications with ASP.NET.
- Contains:
- Tools for developing ASP.NET applications.
- Support for developing and testing web applications.
3. Universal Windows Platform (UWP) development (optional)
- Description: To develop applications that can run on several Windows devices (such as a PC, a tablet or an Xbox), you can install this workload.
- Contains:
- Tools for developing UWP applications.
4. .NET Core cross-platform development (optional)
- Description: If you plan to develop applications that can run on several operating systems (Windows, macOS, Linux), this option is useful. .NET Core makes it possible to develop cross-platform applications.
- Contains:
- Tools for developing applications with .NET Core.
5. Game Development with Unity (optional)
- Description: If you are interested in developing games in C#, you can add this workload. Unity uses C# as its main scripting language.
- Contains:
- Integration with the Unity editor for game development.
After choosing the main workloads, you can customize the installation by adding or removing additional components. To develop classic desktop applications in C#, the recommendation is to choose the ".NET Desktop Development" workload as the base. If you want to explore web development or cross-platform development, you can add other workloads too.
.NET Desktop Development already includes everything needed to develop Windows applications, including Windows Forms (WinForms) and WPF (Windows Presentation Foundation), which are the main technologies for creating desktop applications in C#.
Starting Visual Studio
After the installation we will start Visual Studio and choose one of the offered themes, as shown in the following picture:Figure 3: Starting Visual Studio 2022 Community, choosing a theme
Now everything is ready to create our first simple program in the C# language.
Example 1: Set several values of different types and display them on the console.
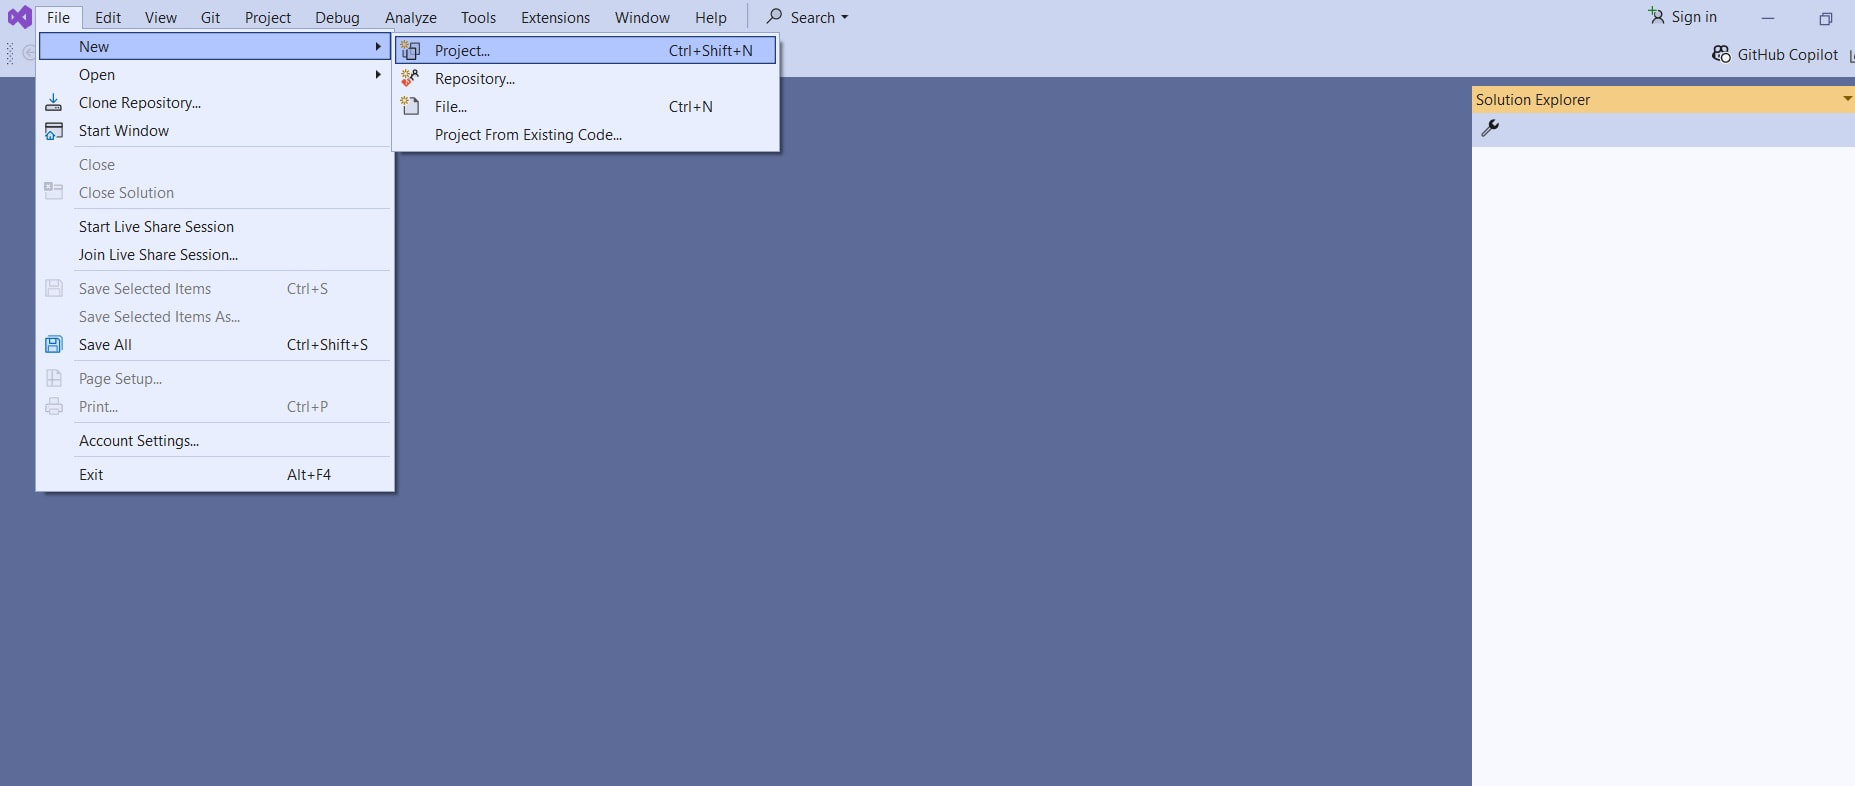
Let us create a new project by clicking File->New Project in Visual Studio, as shown in the following picture:
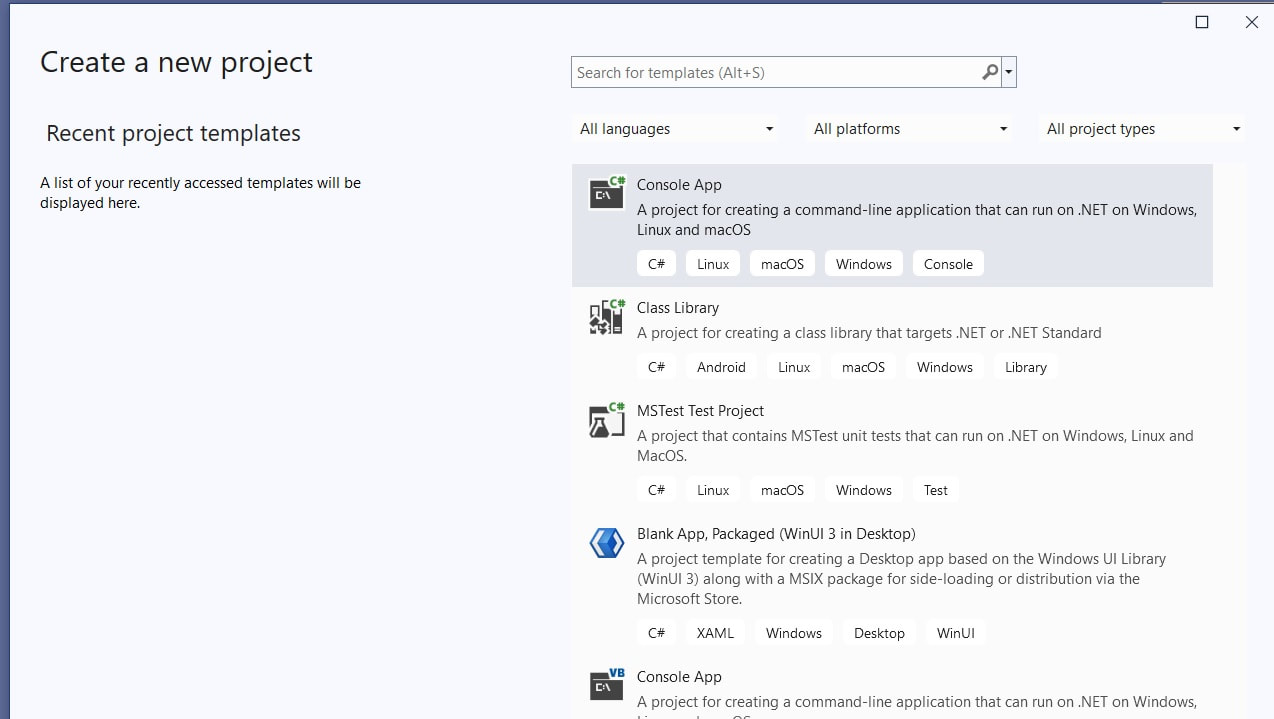
From the offered options we will click Console App (see the picture):
We can also tick the option to put the solution and the project in the same directory.
This option should be ticked:
- when you work on a small, simple project that probably will not grow or be extended. Putting the solution and the project in the same directory can simplify the structure and make navigation easier.
- Experimental or educational projects: For projects meant for learning, experimenting or quick prototyping, merging the directories can be a faster and simpler option.
In the next window we will tick the option: "Do not use top-level statements".
Top-level statements are a way to write a simple C# program without explicitly defining a Main method or a class. They were introduced in C# 9.0 and allow shorter and simpler code, suitable for small applications, scripts or learning. For example:
// An example of top-level statements
Console.WriteLine("Hello, World!");
This code is compiled as if it were inside a Main method, even though the method is not written explicitly.
If you choose this option, Visual Studio will not use top-level statements; instead it will generate traditional C# code with an explicitly defined Main method inside a class. This is useful if you prefer to work with the standard structure of a C# program, especially for more complex applications.
namespace DataTypesExample
{
    internal class Program
    {
        static void Main(string[] args)
        {
            Console.WriteLine("Hello, World!");
        }
    }
}
Visual Studio for .NET 6 and later includes "implicit using directives", so using System; is not written at the top – Console is still available.
We have created a simple program that prints the text "Hello World!" on the console.
Explanation:
- using System; Includes the basic .NET namespace that contains common classes such as Console.
- namespace DataTypeExample: Defines a namespace for organizing the code. Everything inside this block belongs to the same namespace.
- class Program: Defines the class Program, which is the main class of this program.
- static void Main(string[] args): This is the main method, which is called when you start the program. In C#, the Main method is the entry point of the program.
- Console.WriteLine("Hello, World!");: This line prints the text "Hello, World!" on the console.
Namespaces
A namespace is a way of organizing code in C# that helps group related classes, structures, interfaces, enumerations and delegates. In this way name conflicts between different parts of the code are avoided. A namespace lets a class with the same name be used in different contexts without a conflict.
System is one of the most important namespaces in C# and serves as the base namespace for many fundamental classes in the .NET framework. It contains classes that provide basic functionality, such as working with strings, dates, the console, formatting, exceptions and other basic operations. For example:
- System.String is the class for working with text data.
- System.DateTime is used for working with dates and times.
- System.Console makes it possible to read and print data on the console.
By using the System namespace we can use this basic functionality without having to define or implement those functions ourselves. For example:
using System;

namespace MyFirstProgram
{
    class Program
    {
        static void Main(string[] args)
        {
            Console.WriteLine("Hello, World!");
        }
    }
}
Here, System gives access to the Console class, which is used to print text on the console.
Running an application in C#.
To build the application and start the program (build and run), click the button of the same name, which is circled in the following picture. After the program starts, the text "Hello World!" appears on the console (see the picture):
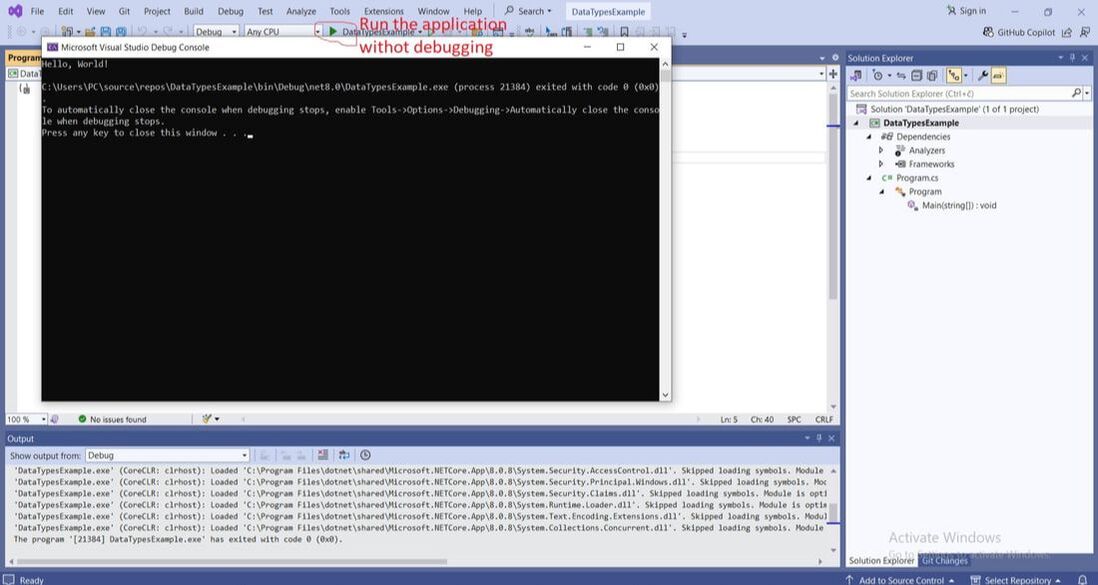
Inside the Main method we will replace the only statement, the one that prints the text "Hello World!", with the following code (see the next picture):
namespace DataTypesExample
{
    internal class Program
    {
        static void Main(string[] args)
        {
            // Declaring and initializing different data types
            int number = 42; // Integer (whole number)
            double decimalNumber = 3.14; // Double (number with decimals)
            char character = 'A'; // Char (a single character)
            string text = "This is a C# program"; // String (a sequence of characters)
            bool logicalValue = true; // Boolean (logical value)

            // Printing the values on the console
            Console.WriteLine("Number: " + number);
            Console.WriteLine("Decimal number: " + decimalNumber);
            Console.WriteLine("Character: " + character);
            Console.WriteLine("Text: " + text);
            Console.WriteLine("Logical value: " + logicalValue);

            // Keeping the window open until the user presses a key
            Console.WriteLine("\nPress any key to exit...");
            Console.ReadKey();
        }
    }
}
The picture below the code shows where the namespace, the class, the main method and Solution Explorer are in Visual Studio. The picture shows the Serbian version of the code (variables broj, decimala, karakter, tekst, logickaVrednost) – the structure is the same.
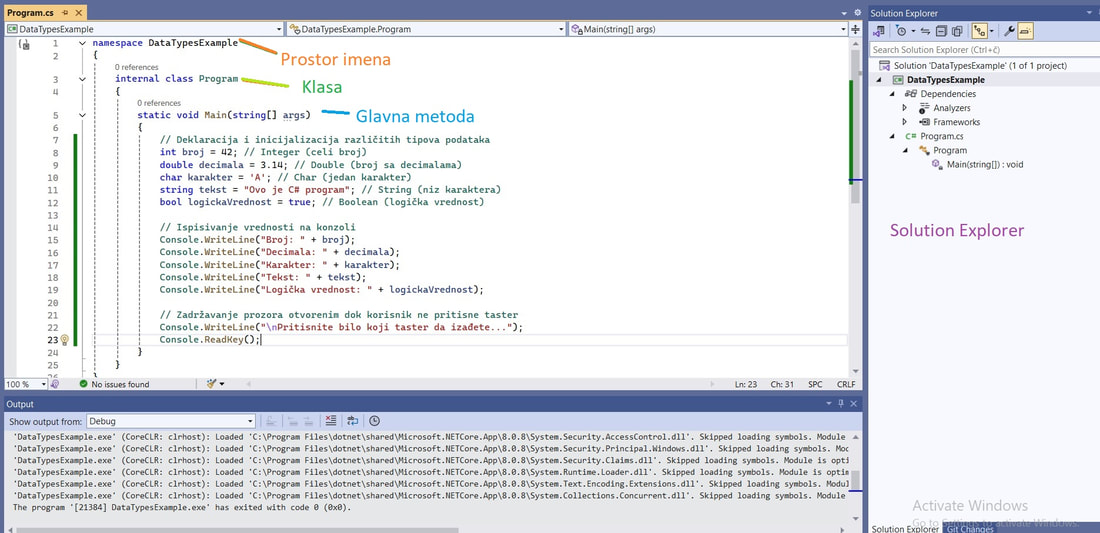
Explanation:
- int number = 42; Declares the variable number of type int and assigns it the value 42.
- double decimalNumber = 3.14; Declares the variable decimalNumber of type double and assigns it the value 3.14.
- char character = 'A'; Declares the variable character of type char and assigns it the character 'A'.
- string text = "This is a C# program"; Declares the variable text of type string and assigns it a text value.
- bool logicalValue = true; Declares the variable logicalValue of type bool and assigns it the value true.
After the application starts, the values of these variables are displayed on the console:
Program output:
Number: 42
Decimal number: 3.14
Character: A
Text: This is a C# program
Logical value: True

Press any key to exit...
On a computer with regional settings that use a decimal comma, the second line is printed as Decimal number: 3,14.
Program structure in Visual Studio
If we look at the picture, besides the code in the editor we can also see:
- Solution Explorer
- Output
Solution Explorer
Solution Explorer is a key tool in the Visual Studio environment that lets you view, organize and navigate through all the components and files that make up your project or solution. Here are the basic features and purposes of Solution Explorer:
- Viewing and organizing the project: It shows all the projects, files, resources, references, libraries, configuration files and other items that are part of the solution. A solution can contain one or more projects, and each project can contain different kinds of files (for example .cs, .xml, .config).
- Navigating through the code: It lets you quickly find and open files in the project. When you click a file in Solution Explorer, it opens in the main Visual Studio window, where you can edit it.
- Managing references and dependencies: Through Solution Explorer you can add and remove references to other projects or libraries (for example NuGet packages) that the project needs.
- Performing operations on projects: It lets you work on individual projects or the whole solution, such as building, running, adding new files, renaming, moving files or even adding new projects to the solution.
- Managing configurations: It lets you manage different build configurations (for example Debug, Release) and settings specific to a project or solution.
- Integration with version control: When you use version control (for example Git), Solution Explorer shows the status of the files (changed, added, deleted) and lets you perform basic version control operations directly from Visual Studio.
Solution Explorer is the central tool for managing all aspects of your project, making it easy to maintain and develop complex applications.
The Output window in Visual Studio displays various information while you develop an application. In it you can see the messages generated while the code is compiled, run and debugged. Here are a few specific uses:
- Error and warning messages: The Output window shows all the errors, warnings and informational messages produced by compiling the code. This includes syntax errors, linker errors and other problems that need to be fixed.
- Messages produced by the program: You can use the Output window to display messages from your program, especially while debugging. For example, if you use Console.WriteLine in a console application, the message will be shown in the Output window.
- Information about the build process: When you start building a project, the Output window shows a detailed record of how the build is progressing, including which files were compiled, which libraries were linked and how long the build took.
- Information from third-party tools: If you use tools or extensions inside Visual Studio (such as testing tools or source control integration), the Output window can show the messages those tools generate.
- Following debug information: When you debug an application, the Output window can show information about the running processes, threads, exceptions and other important aspects that help you understand how the code behaves.
Check your knowledge
Open the quiz
Your first application in C#
1. Which workload in the Visual Studio installation is enough for console and Windows Forms applications?
2. Which method is the entry point of a C# program?
3. What is using System; at the beginning of a program for?
4. What does Console.WriteLine print?